Modules and Tags
Overview
Modules are tagged groups of pre-modeled Pipelines used in a Solution that provide the grouping of individual resources under a common theme (e.g., manufacturing, retail, marketing). When a solution is used to create a model, modules provide a choice for which parts of the solution to deploy.
Tags
Tags are text labels that make it easier to find resource collections using the search feature in Resource Explorer.
Add a tag
Add a new tag
Tags can be created and added to resources using the Tags text-box on the properties page of individual resources.
Tagged resources can be searched for by their tag names. If they are part of a Solution, they are included with the Module of the same name.
Note
If many resources are to be tagged the same, it is faster to create one folder for all resources. They will then automatically inherit the folder's tags. Tags can only be edited on the folder's Properties screen.
Add an existing tag
You can add a tag to an existing resource using the Tags text-box on the properties page of individual resources.
Note
If a previously-defined tag does not appear in the list, there are three possible reasons:
The resource in which the tag was created has not been saved.
The resource in which the tag was created is outside the tag scope boundary of the current resource.
The current resource is displayed in a tab that was already open when the new tag was created in another resource. The list of previously defined tags is not updated until the current tab is closed and reopened.
Delete tags
Remove tags from individual resources or remove them from all resources within a path.
Individual-Resource. Click the small x icon that appears when you hover over a tag. If the tag is still applied to other resources, it remains in use and is available from the list of tags that appear when a new tag is added.
Note
If a tag is grayed out, you will be unable to delete it. This occurs when the tag is inherited from a parent folder. The tag may only be deleted from the parent folder's properties screen.
All resources. Right-click the tag you want to remove and select Delete.
Rename tags
Rename all instances of a tag from a specific location in Resource Explorer (within a specific path) using the Rename option (right-click menu).
Tag scope
When you add a tag to a resource, a list of existing tags appears in a drop-down box. This list of tags is compiled from all tags present within the current tag scope. By default, a tag scope boundary is set on each user's personal folder and the Public folder. This means that tags created by one user are not accessible by another user.
You may need to control the tag scope more closely. For example, if you have more than one model intended to be used as a solution, you need to ensure that tags used in one model are not available to be applied to resources in another model.
This is achieved by applying the Auto-complete tags under this resource property to a model, which then acts as the upper boundary for the tag scope. The tag scope is then limited to the model and its child resources. The Auto-complete tags under this resource property may also be applied to folders.
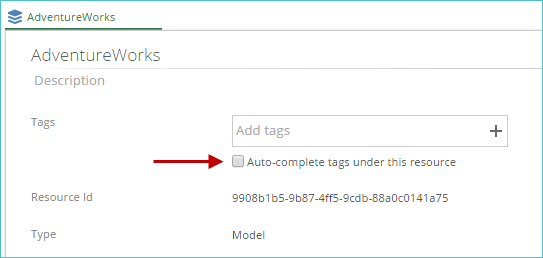
To apply this property, open the model's properties screen.
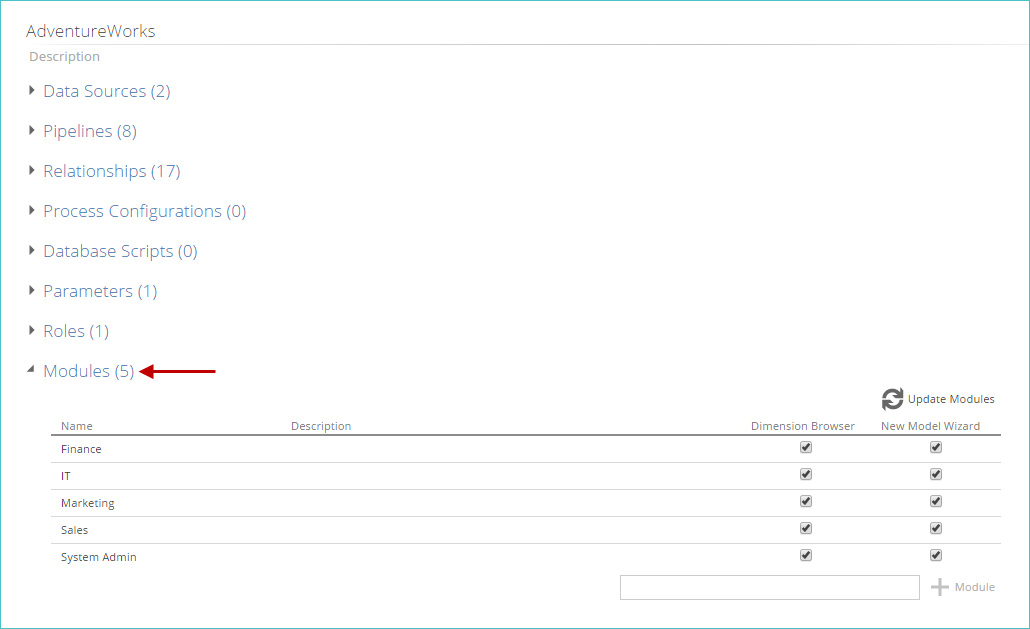
Modules
Add modules to a model
Tags may be added to a model by adding tags to individual resources or creating a module via the Module list on the model screen.
Tags assigned to pipelines within a model and non-model resources within the current tag scope will automatically appear as modules on the model screen. (You may have to click the Update Modules button to display them.)
Once added, you can determine how they will be used by models created from the current model via a solution resource.
Important
Modules must appear in the Modules list in your model and be selected (via the New Model Wizard check-box) for them to appear in the model creation wizard when creating a new model from a solution.
In the text box below at the bottom of the Modules list, type the name of the module you want to add. By default, no modules are present in your model.

Click the + Module button.
The module is added to the list of existing modules. By default, all available module options are selected.
View modules in your model
Use the Modules list, available from the model screen, to view the modules currently in use. The listed modules are available for inclusion if the current model is used to create a solution resource.
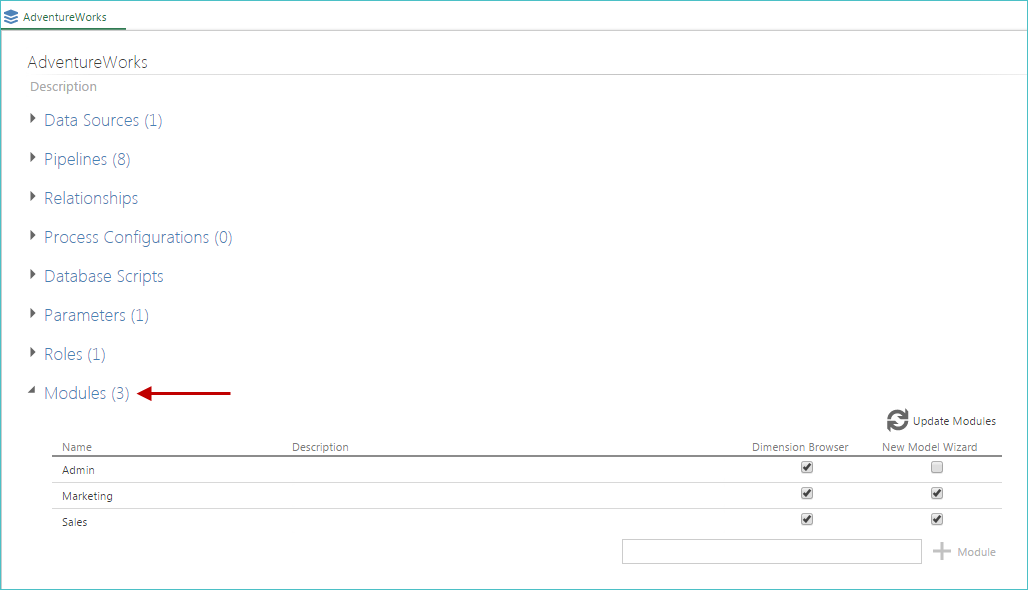
Click the Update Modules button to ensure that you view the most up-to-date module list.
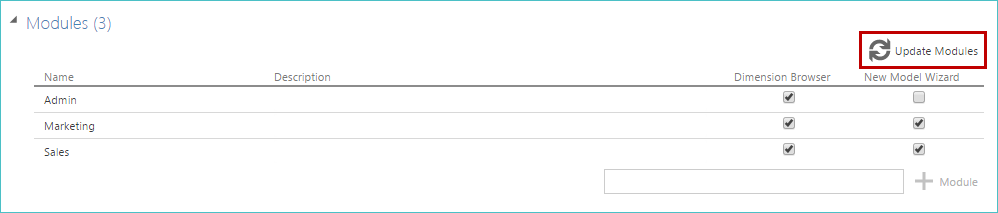
This button is useful if you have recently made changes to your modules, such as adding new modules, tagging non-pipeline resources, or renaming and deleting modules.
Hover over a module name in the Modules list to view associated pipelines.

Note
If no pipelines are associated with the module, only the module's name is displayed.
Remove a module
Modules can be removed from a model using the Modules list.
Verify that you are viewing the Modules list.
Right-click a module and select Delete. A verification message will appear.
Click Delete. Tags with the same name as the model will also be removed from all resources within the current tag scope.
Using Modules in Solutions
Deploying solutions
Select modules when creating a model from a solution
Solutions typically contain resources that are always needed, regardless of the modules deployed. These "foundation" resources are untagged and are not part of any module.
Untagged resources are always deployed automatically. Supporting resources that are of type drill-across or link are not deployed. Supporting resources of other types are included. Excluding these two resource types reduces the number of supporting resources outside the module deployed when a module is selected.
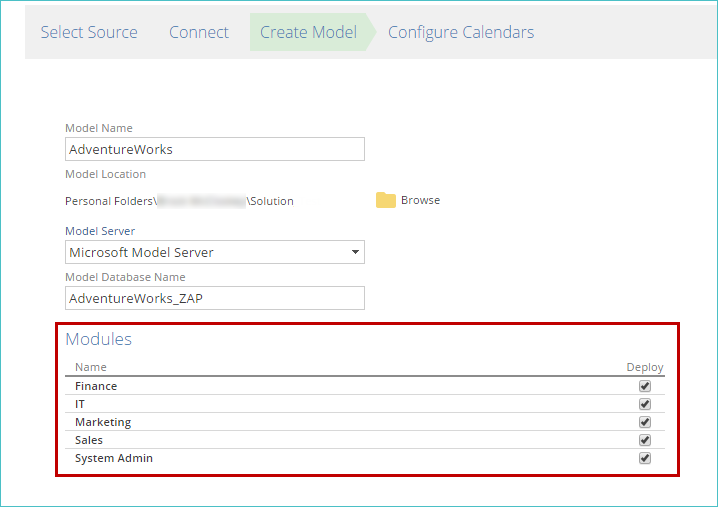
When a model is created using a solution that contains modules, you are given the option to select the modules required from the Create Model screen of the model creation wizard.
 |
When deploying a specific module from a solution, dimensions that are not explicitly tagged, but are determined by Data Hub to be needed for your model, are automatically included in the model's Dimension Tree. In other words, related dimensions are included in your model even if they are not tagged as part of a module.
Note
Hover over a module name in the Modules list to view the pipelines associated with the module.
Once the model has been created from the solution, you can view modules in the model screen (via the Modules list).
 |
Use the check-boxes (on the right side of the list) to control each module's visibility.
Module and supporting pipeline behavior
Selecting a module reduces the number of imported pipelines as part of a model. This behavior is achieved by importing only pipelines that are tagged as part of the module and supporting pipelines.
For a pipeline to be regarded as a supporting pipeline, it must have a relationship and a lookup to a tagged pipeline.
This is enabled in Data Hub via the following :
Relationships in tagged pipelines to pipelines that have not been imported (because they are only related but are not used for a lookup) are removed.
Tags in supporting pipelines related to modules that were not imported are removed.
Pipelines in modules that are not selected to display in the new model wizard (via the New Model Wizard option on the Modules list) are not imported.
Specify module functionality
Once a module has been added to a model, you can determine where it will be visible. Settings made by a solution designer will appear in the model resulting from deploying the solution. Settings may then be changed.
The following options are available:
Dimension Browser check-boxes. When one or more modules is selected, a drop-down list will appear in the Dimension Tree, allowing you to choose a module. The dimension tree will then display only measures and dimensions for the selected module, making it easier to find the cube items required. An item with the same name as the model always appears at the top of the drop-down list.
You may choose to disable these check-boxes if, for example, your modules are used only for cube security rather than to control the dimension tree display.
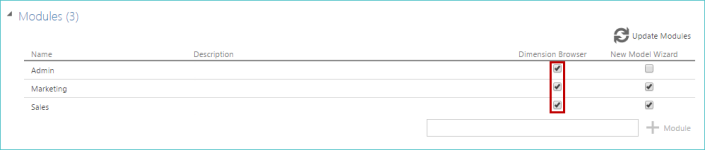
New Model Wizard check-boxes. If selected, when the model is used to create a solution, the corresponding module will be available for selection on the model creation wizard's Create Model screen.
Important
Unless a user is licensed to create solutions, the New Model Wizard check-boxes are not displayed, as they are only relevant when creating a solution. In these cases, only the Dimension Browser check-boxes are shown.
If a module is not selected here, its pipelines will not be deployed unless they support pipelines. In addition, pipelines in modules that do not have this option are also not imported.
Solution designer features
Advanced options are used by solution designers (those who will create the modules for use within a solution), including editing and determining functionality (visibility).
Tags and modules
Tags are assigned to individual resources, allowing them to be grouped into modules using the same tag names.
Pipelines
Tags assigned to pipelines within a model will automatically appear as modules on the model screen. (You may have to click the Update Modules button to display them.)
Other resources
Tags assigned to other resources, such as analyses and dashboards, will not appear in the model's list of modules. However, tagged non-model resources will be deployed with a solution's module if the tag name assigned to those resources matches the module's name.
Once these steps are performed (a tag is assigned to non-model resources and defined in the model), the module is included in deploying a solution.
Resources included in a solution’s Development folder do not need tags for inclusion in the solution. However, modules allow you to group resources included with a solution. When a model is created from the solution, the user deploying the model can control which resources are deployed during the model creation process (based on the modules the resources are part of).
Resources that are part of modules that are not selected will not be deployed. All untagged resources are always automatically deployed by the solution. If modules are not used, all included resources are automatically deployed.
When a tagged item (a resource in a module) is deployed, the resource itself is deployed. Any supporting resources are used by the resource (as automatically determined by Data Hub). For example, if a tagged dashboard is selected, its deployment would also include any analyses displayed on it and any pipelines that feed information into those analyses. In turn, for each pipeline in the module (known as a dependent pipeline), Data Hub deploys its data source and supporting pipelines, as necessary.
Note
To be regarded as a supporting pipeline, the pipeline must be used as the basis of a lookup by the dependent pipeline. Pipelines that are merely related to a dependent pipeline will not be included.
Any relationships (in a dependent pipeline) to pipelines that are not imported will be removed.
Pipelines that are imported because they are supporting pipelines (but tagged with the names of modules that are not imported) will have those tags removed.
The behavior of folder resources, when used with modules, varies from other resources in the following ways:
If a resource included in a module (tagged) is also in a folder, the folder itself is automatically added to the module, regardless of how the folder is tagged.
Unlike other resources, folders that are not included in a module are not automatically deployed.
Module creation process in a solution
A solution designer would perform the following steps to add modules to a model that is being used as a solution:
Consider the scope over which tags apply and set the tag scope boundary.
Add modules to the model.
Assign functionality to each module.
Add appropriate tags to pipelines and other non-model resources to be part of each module.
Create a solution from the model and test its deployment
Add a module description
Once a module is added to the model, you can define a module directly on the Modules list.
 |
This description is useful when the module appears in the model selection wizard (when creating a model from a solution). It can help users determine if the module should be included in the new model.