Data Source configuration
Overview
Data sources refer to any resources that are used to capture the details necessary to extract data from a source. They may also be the source for data itself (e.g. Database and API or file).
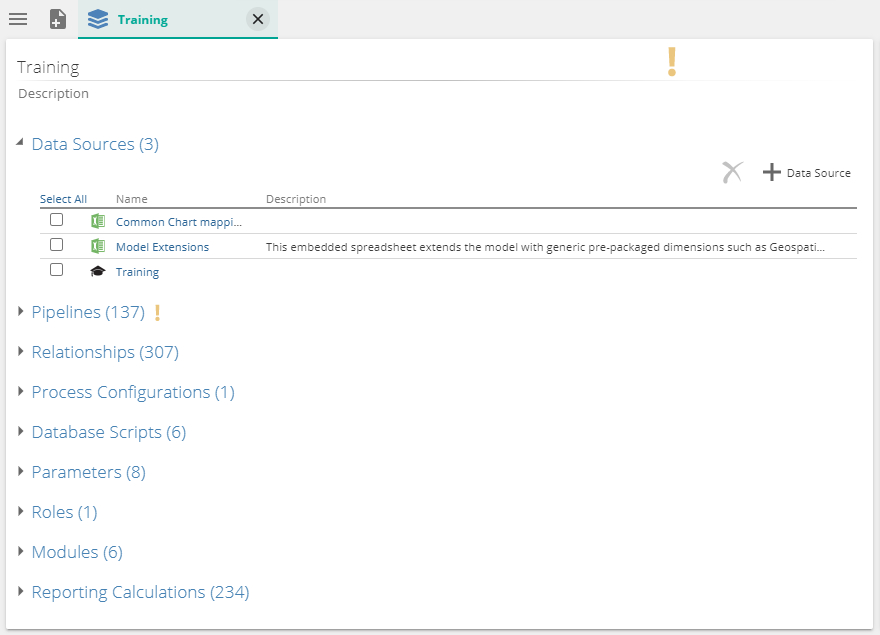
The data source(s) of a model can be seen by expanding the Data Source section from the model screen.
 |
Data Source preview pane
A Preview Pane is available at the bottom of the data source TABLES tab. The information displayed is taken directly from any selected table in the source table. This area allows you to see data as it appears in the source, before you import it via a pipeline.
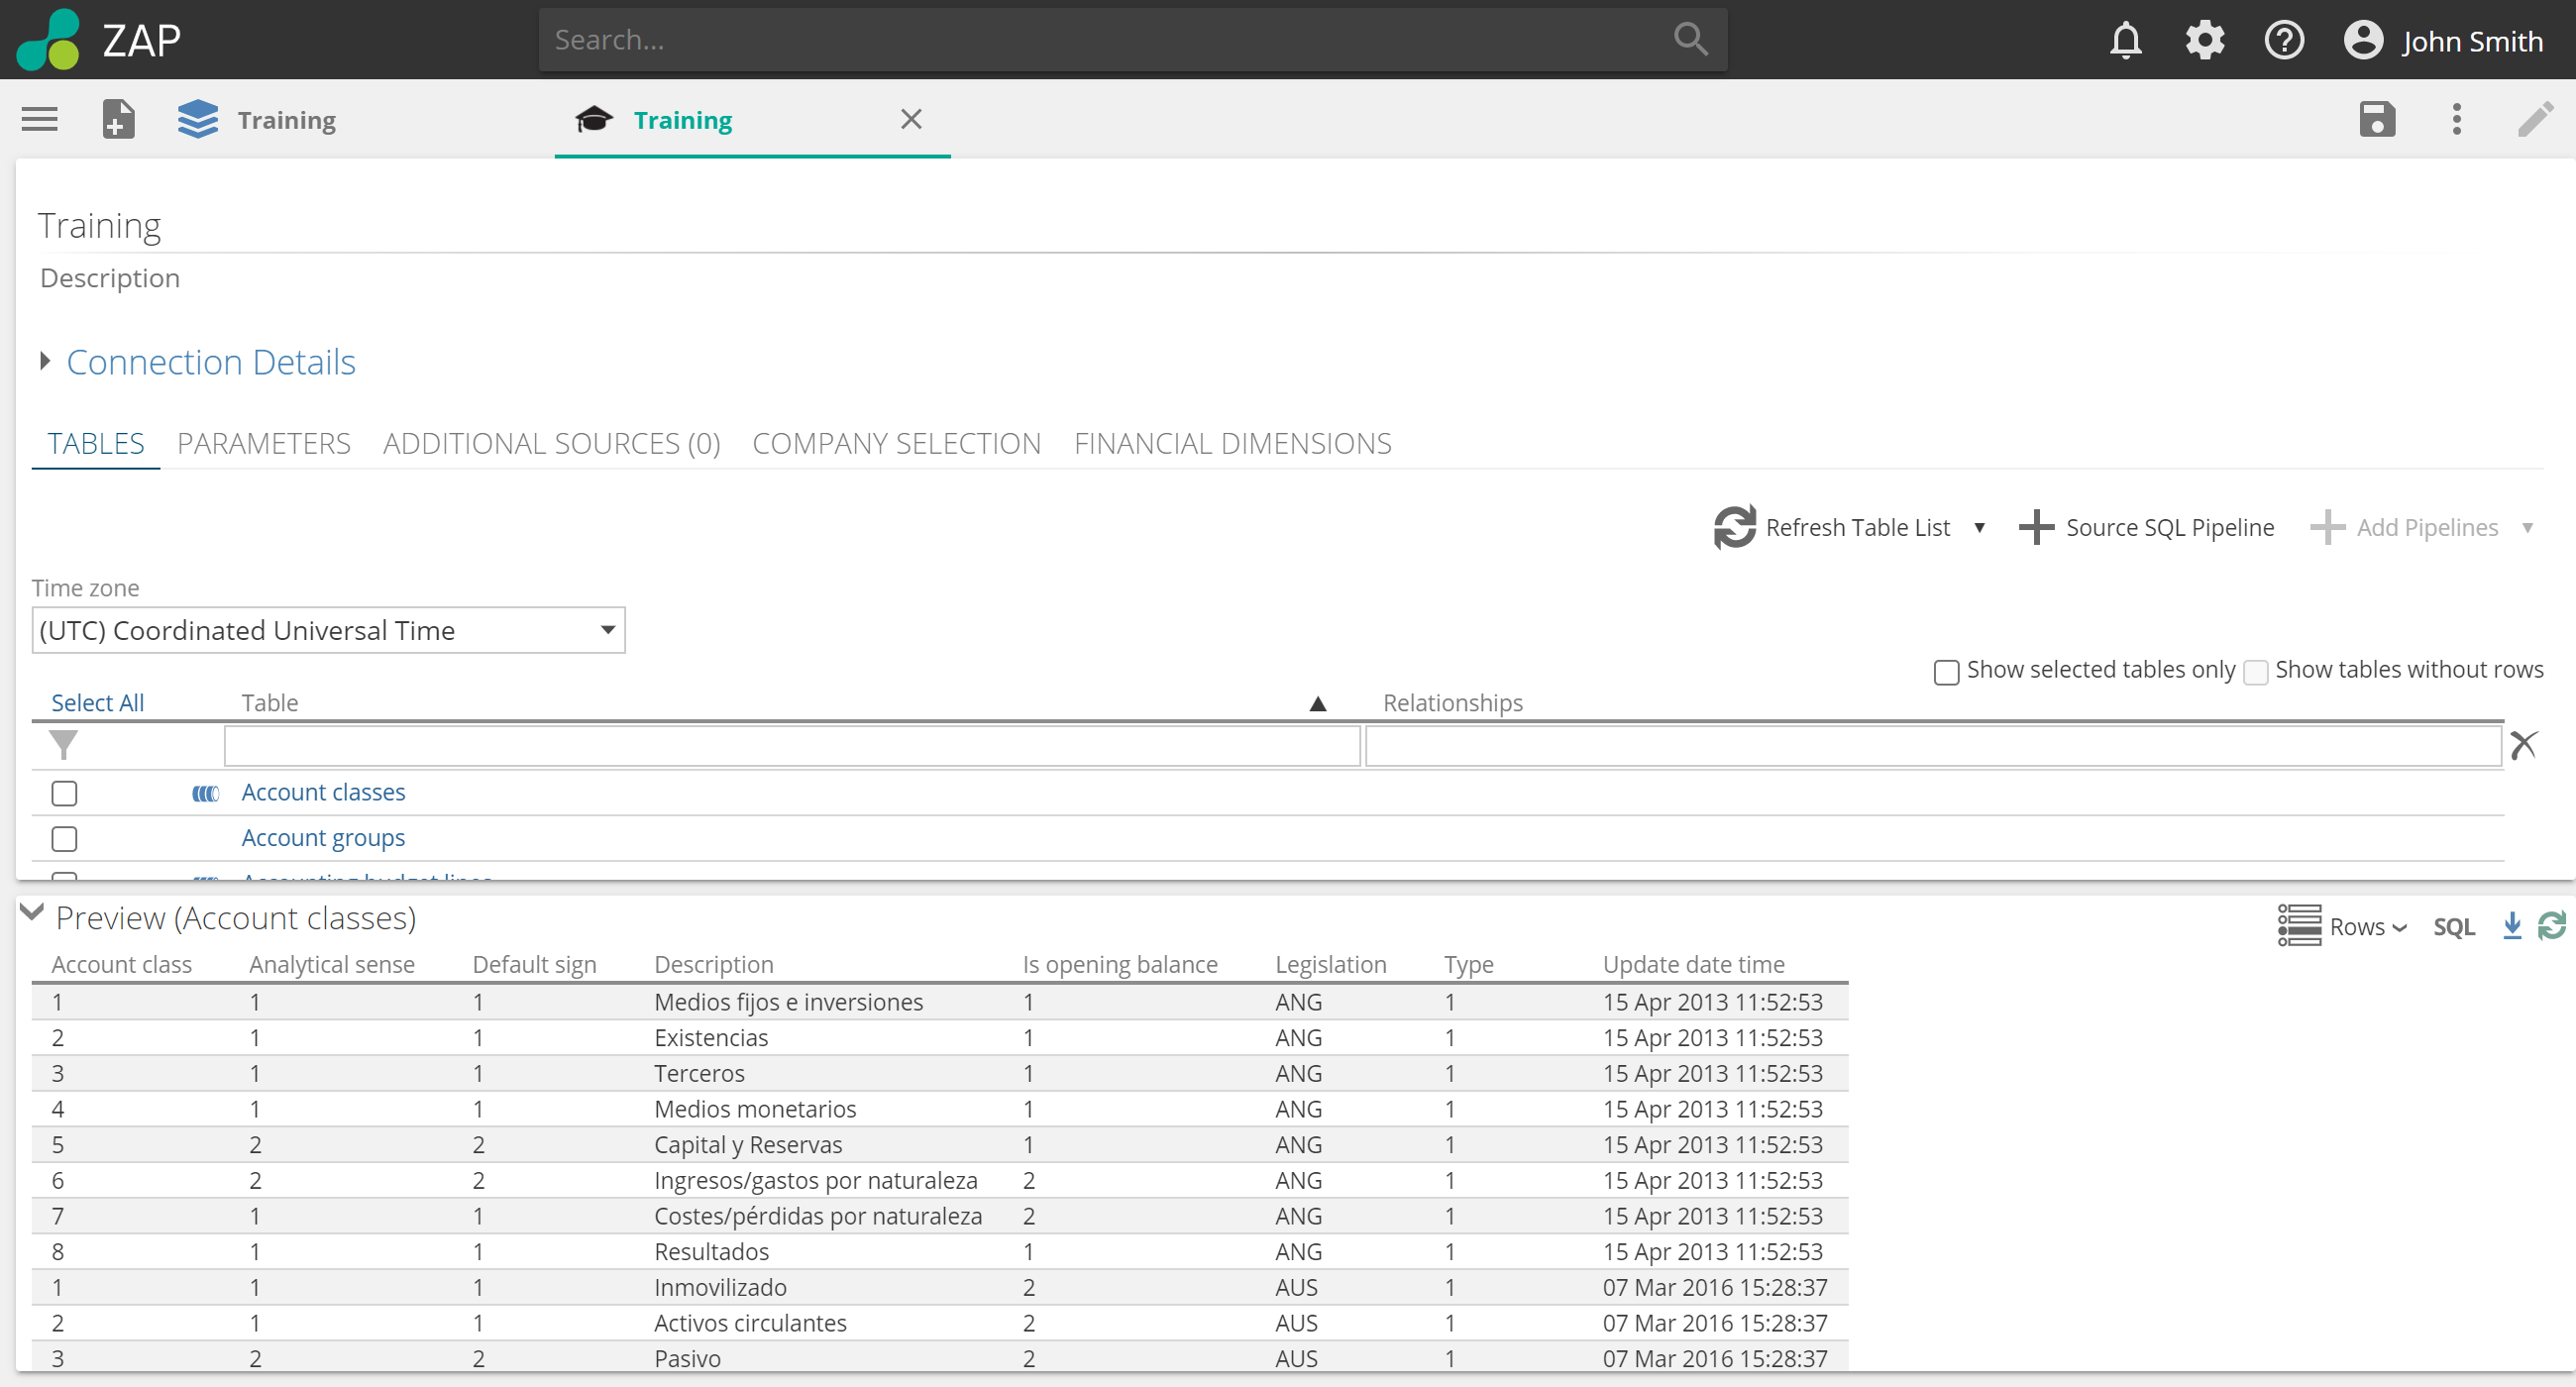 |
Preview pane features:
Configure row limits
This applies a limit to the number of rows shown in the preview panel to improve performance. The default value can be adjusted by entering a new value into the Row Limit field and clicking apply.
Preview SQL
This allows the user to enter an SQL query and preview the result.
 |
Download preview data
This downloads the data source preview as a .zip archive containing a .csv (Comma-Separated Values) file. The .csv file will contain all rows in the preview table, regardless of the Configure Row Limits setting.
Refresh preview
Refreshes the contents of the preview panel from the data source.
Data Source settings
Data source settings are grouped into two functional areas:
Data source screen: Change general settings like adding pipelines and refreshing source data.
Data source properties panel: Change the behavior of pipelines during profiling and processing.
 |
Data source screen
Access data sources
View an existing data source by clicking it in the Data sources list on the model tab.
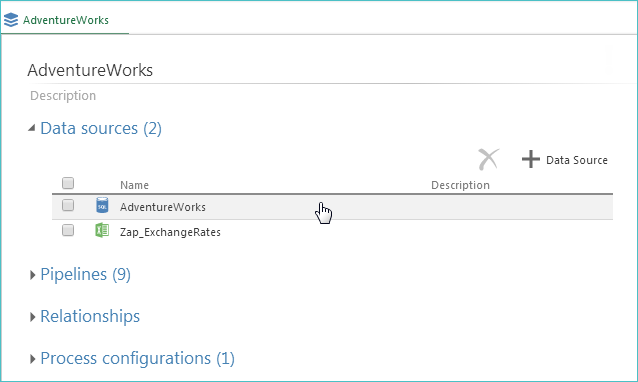 |
Both the data source name and an icon representing its type (e.g. CSV file, SQL Server database) appear in the list.
Note
If a data source is indented in the list, it has been added as an additional data source (within the first non-indented data sources above it).
Clicking any data source will display its information in a separate tab and provide access to additional information.
View data source details
When you click a data source in a model tab Data Sources list, the data source details are displayed in a separate tab, allowing you to view both its definition (directly on the tab) and its properties (via the Properties panel on the right side of the tab).
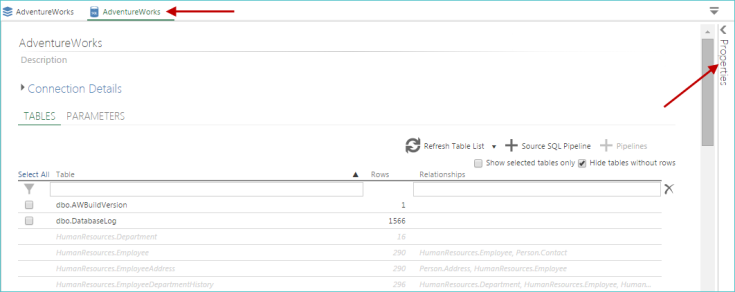
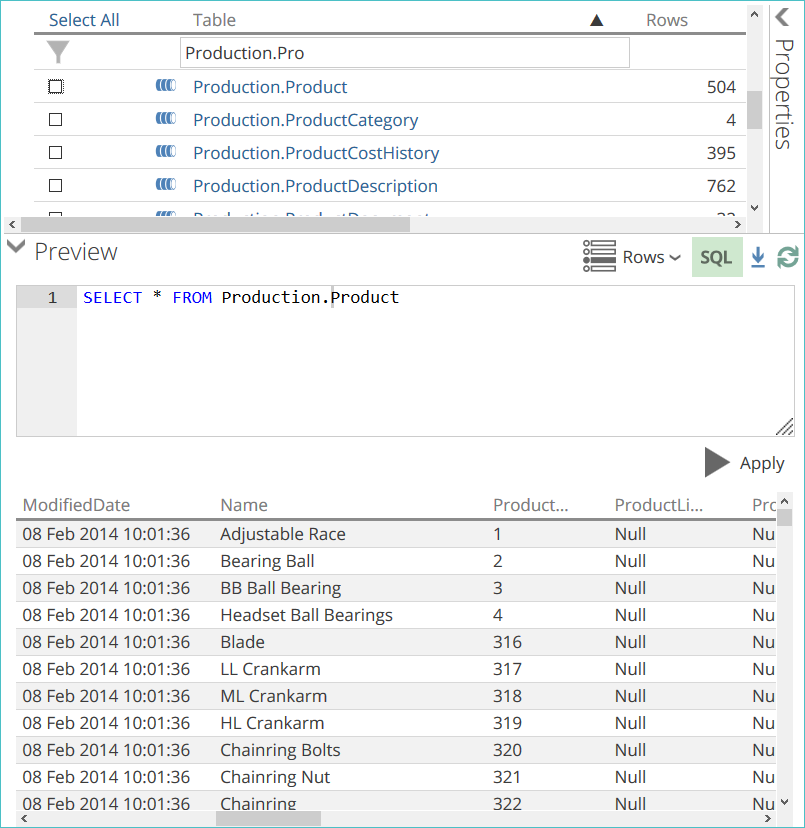
Data source tables tab
The TABLES tab displays all tables available from the current data source. Tables already included in the model (as pipelines) have an existing pipeline icon beside their names.
You can hover over an individual table to view an infotip.
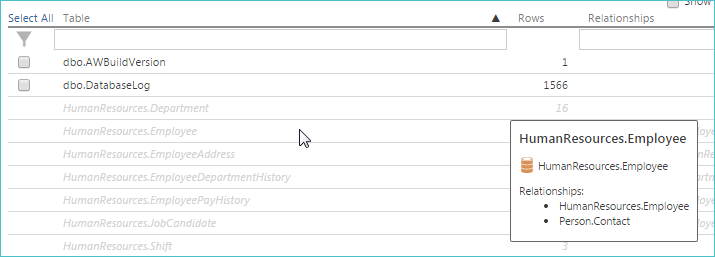
The infotip displays the following information:
Table display name
Table database name (noted by the database icon)
Table's description (if one has been defined)
Defined relationships
Note
The text in the info tip itself can be selected for copy/paste operations.
Change data source settings
Data source settings (that were initially defined when the data source was specified using the model wizard) can be updated at any time. Simply access the data source from the model tab, and change the settings, then save the data source.
When changes are made to a data source's connection details, a message appears to the left of the TABLES tab Refresh Table List button, informing you of any additional actions that need to be taken to update the data source.
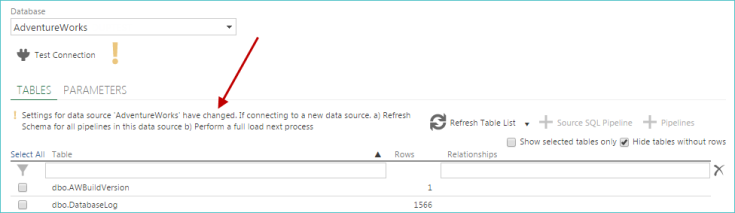
Once the data source is saved, any changes made to these settings are automatically updated in the related model pipelines.
Note
There are some values, such as incremental loading settings for some data sources, and the Culture and Delimiter settings for CSV data sources, for which this automatic inheritance may be overridden on a pipeline-by-pipeline basis. This is done using the Override settings from data source check box on the pipeline SOURCE pipeline tab.
Refresh data source information
Use the Refresh options to verify that you are viewing the most up-to-date information from your data source. Refresh the currently displayed table or all of the source schema.
Click the Refresh button and then choose one of the following options:
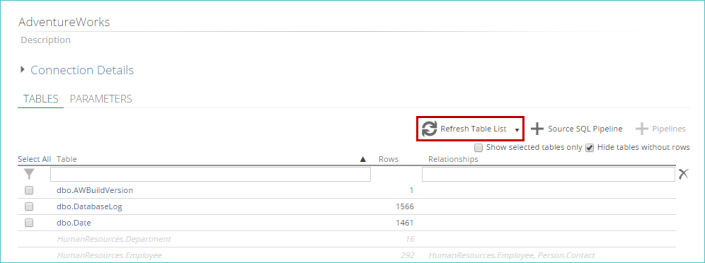
Refresh Table List. Reloads the list of tables and their properties from the data source. This allows you to verify that you are viewing the most up-to-date list of tables available in the data source. Only the information shown on the TABLES tab, adjacent to this button, is reloaded. This option is useful if you know exactly what has changed in your data source (such as a new table being added), and you simply want it to be selectable from the TABLES tab.
Refresh Source Schema. This reloads the source schema, including the table list, for every pipeline that originates from the current data source (the data source whose tab is being viewed). This option is useful if your data source has changed, and you need to be sure that all changes have been propagated to Data Hub or if you are not sure exactly what has been altered.
Note
If you only want to refresh pipeline descriptions (in the Pipelines list on the model tab) use the Refresh Source Schema option.
Add a source SQL pipeline
Use the + Source SQL Pipeline feature to add a new source SQL pipeline to your data source.

Add tables
To add additional tables:
Select the tables on the TABLES tab.
Open a data source tab.
Verify that you are viewing most up-to-date table list by clicking the Refresh Table List button.
From the table of available pipelines at the bottom of the tab, select any currently non-included pipelines using the corresponding check boxes.
Note
Pipelines that are already included in the model have an existing pipeline icon beside their name.
Click + Pipelines.
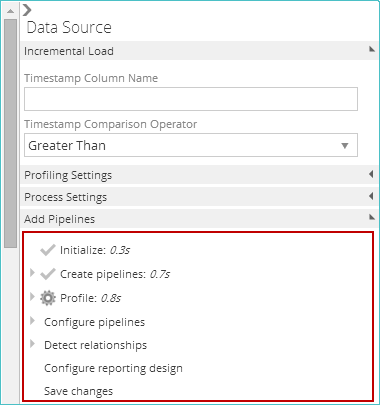
The progress of adding the pipelines is displayed in the Add Pipelines area of the Properties panel.
Pipelines that are already included in the model have an existing pipeline icon beside their name.
Important
If any validation errors exist with the current data source, the + Pipelines button will be disabled until you correct the validation issue.
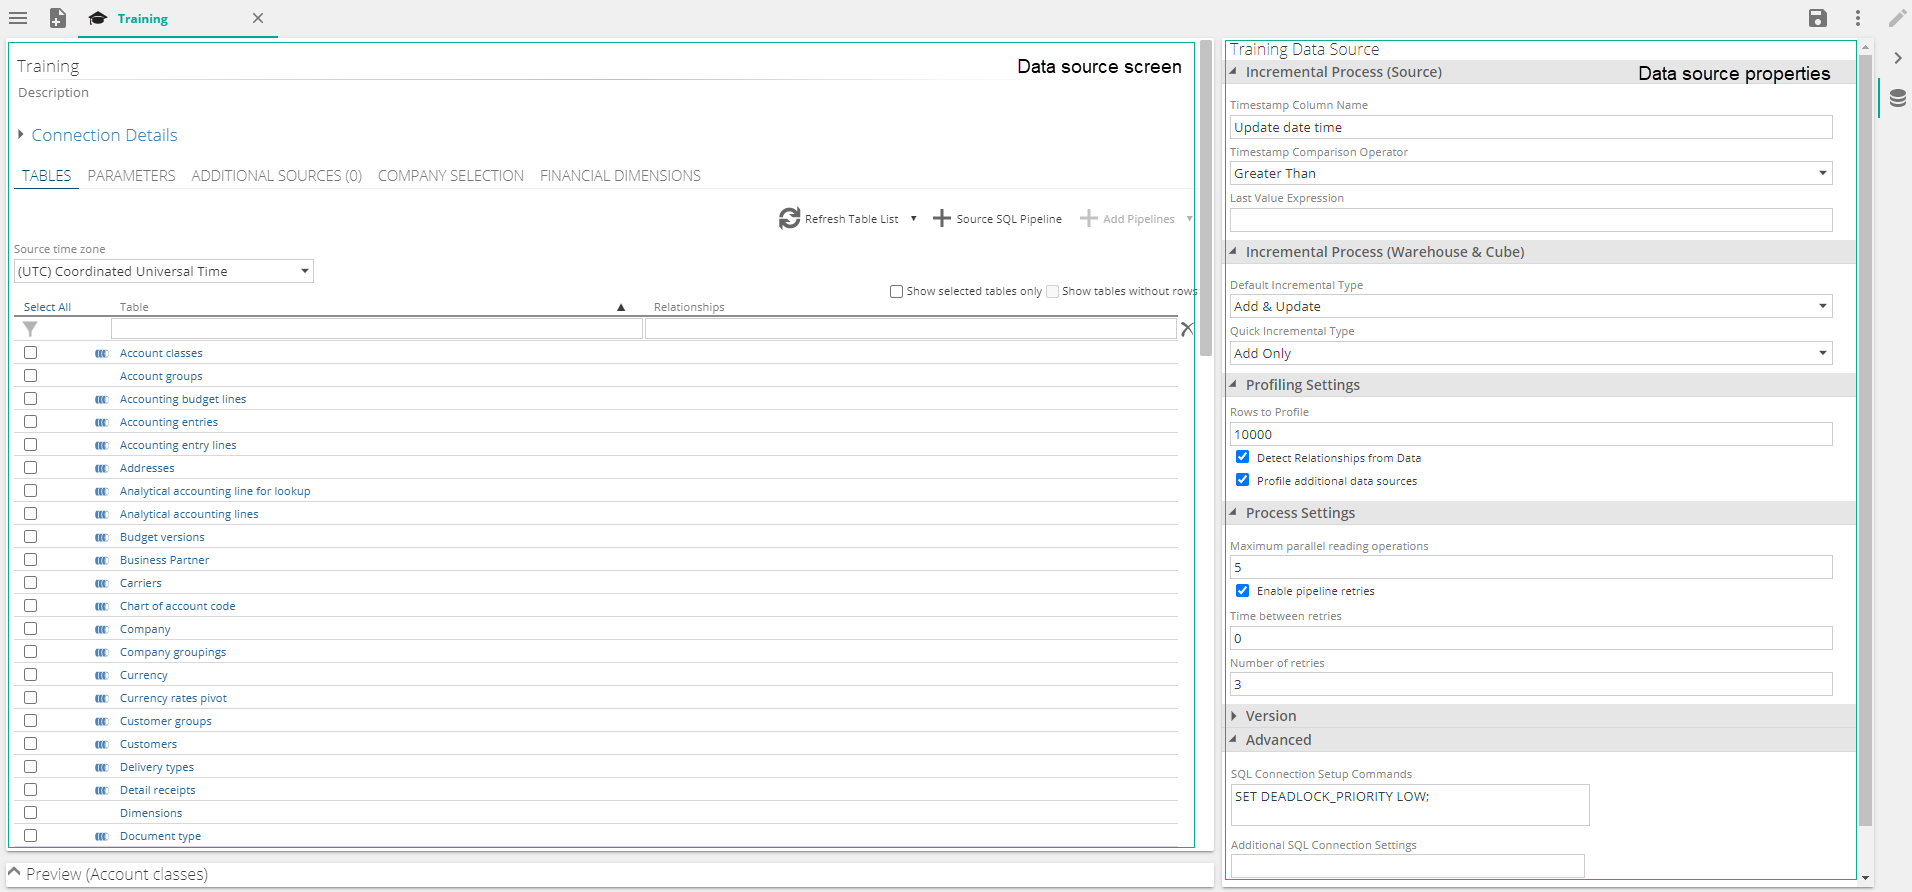
Data source properties panel
Data source properties can be accessed by expanding the Properties panel on the right side of the data source tab.
Note
An additional Add Pipelines section appears in a data source's Properties panel only when pipelines are in the process of being added to it. See the image in the Add tables section.
Profiling settings
The Profiling Settings area contains properties that allow you to refine the behavior of the profiles created for each column.
The following setting is available in this area:
Rows to Profile. This value determines the number of rows in each table of the data source that are examined to build up a profile of each column. The column profiles are displayed as tool tips when hovering over the column in the pipeline schema.
Column profiles are also used to set column widths and to build relationships for data sources that do not have relationship metadata available. The value is a tradeoff between accuracy and speed and varies between data sources. Internet-based data sources may be too slow to allow profiling large numbers of rows.
Increase the value if the profiling information seem inaccurate. Decrease it if profiling is taking too long.
Detect Relationships from Data. Specify whether or not any existing relationship information will be detected and included for all pipelines in the data source. Skipping this detection step (clearing the corresponding check box) can speed up the process of adding pipelines, and the relationships can be defined at a later time.
Process settings
Parallel processing of pipelines significantly improves model processing performance in many scenarios. The Process Settings area contains properties that allow you to specify the maximum number of threads for pipelines that originate from each data source.
The following settings are available in this area:
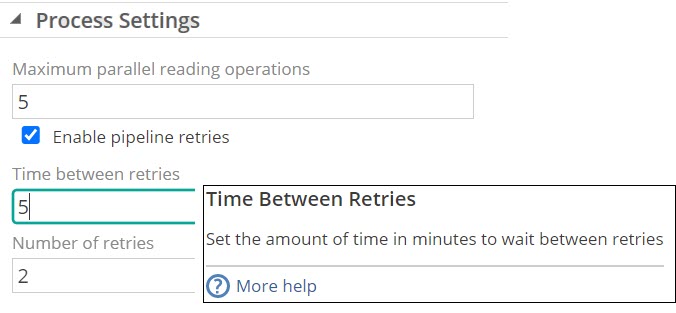
Maximum parallel reading operations. This represents the maximum number of pipelines that use this data source (that will read from the data source at the same time). Increasing this value may improve performance, particularly if the data source is web-based. Alter this setting in conjunction with the Max source reading operations setting. (This controls the overall number of pipelines that can be read simultaneously from all data sources.)
Note
If the total number of threads specified in the Maximum parallel reading operations property for all data sources exceeds the Max source reading operations model property, the thread count for each data source is reduced proportionately to match the Max source reading operations property.
Enable Pipeline retries. This enables the process to retry failed processes based on the configuration settings, instead of failing after one attempt.
Time between retries. Specify the time between each retry - in minutes
Number of retries. Specify the number of times to retry before failing.
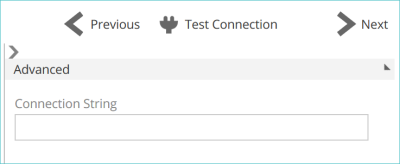
Advanced connection settings
Some data sources have advanced settings that can be modified from either:
The Properties panel when viewing an existing data source, under the Advanced section.
The Advanced panel on the Connect screen when adding a new data source.
The availability of the following settings varies depending on the selected data source:
Additional SQL connection settings
Specify additional connection settings to append to the SQL Server connection string.
For Azure SQL Database connections, see: Microsoft .NET Docs: Connection Strings in ADO.NET.
For Microsoft SQL Server-based connections, see: Microsoft .NET Docs: SqlConnection.ConnectionString Property.
For Oracle Database connections, see: Oracle Help Center: Connecting to Oracle Database - Connection String Attributes.
Alternative authentication mode
It is recommended that the alternative authentication mode is only used when the regular mode fails to connect.
For some Microsoft Dynamics installations, the default authentication method may fail to connect to Application Object Server (AOS). When the Alternative Authentication Mode check box is selected, Data Hub will try to connect by impersonating the current thread with the supplied credentials.
Note
For the alternative authentication method to work, the Data Hub application pool user must have local administration privileges on the web server.
Authentication authority URL
The data source's authentication authority URL. When left blank, Data Hub will attempt to connect to the data source using: https://login.windows.net/<your.tenant.com>
To connect to an on-premise instance of the data source using the Active Directory credentials, enter the Active Directory Federation Services URL, such as: https://<your-adfs-server.com>/adfs
Connection string
This allows additional connection settings to be added for the data source. To view a list of available options for the data source:
Hover over the Connection String field.
On the tooltip, click the "visit here" link.
Example
Url=https://myorg.sharepoint.com;User=admin@myorg.onmicrosoft.com;Password=password;File=Book1.xlsx;
Load table descriptions
When selected, Data Hub will load pipeline table descriptions when they are added to a model. Clearing this option can lead to improved performance when adding pipelines from this data source.
Maximum degree of parallelism
This setting is used to limit the number of processors used by Data Hub to reduce impact on other software (such as a transaction processing system) accessing the same device hosting the SQL Server database.
The default value of 1 limits Data Hub to one processor to minimize resource usage.
Increasing the value may improve Data Hub performance, but can impact the performance of other systems using the database host device.
Set the value to zero to allow SQL Server to determine the maximum number of processors to use.
Note
For information on the Maximum Degree of Parallelism setting, see: Microsoft SQL Docs: SQL Server 2017 - Configure the max degree of parallelism Server Configuration Option.
Service data batch size (Rows)
When the Read from database directly option is not selected, Data Hub retrieves data in batches containing the specified number of rows. Smaller batches can improve reliability, but increase retrieval time.
If there is a reliable connection between Data Hub and the Microsoft Dynamics server, increasing this value may improve performance.
SQL connection setup commands
Used to apply SQL SET statements for Data Hub SQL sessions on this data source.
Note
For information on SQL SET statements, see: Microsoft SQL Docs: SQL Server 2017 - SET Statements (Transact-SQL).
The SET DEADLOCK_PRIORITY_LOW option is the default value. This ensures other processes have priority over Data Hub when accessing the same database resource. This setting minimizes impact of Data Hub on processes using SQL Server.
Note
For more detail on deadlock priority, see Microsoft SQL Docs: SQL Server 2017 - SET DEADLOCK_PRIORITY (Transact-SQL).
Incremental process settings
Source processing types
Incremental Processing has two sections that allows you to control the performance of incremental loading. Incremental processing for the Source and/or the Warehouse and Semantic Layer.
These settings are then propagated down to each of the data source's source table and SQL pipelines.
Incremental Process (Source): Allows you to control how the data is loaded from the source database and sent to the data warehouse.
Incremental Process (Warehouse & Semantic Layer): Allows you to specify how data is loaded from the tables in the warehouse.
Note
You can alter these settings to control the incremental load behavior for individual pipelines as well, if any inherited data source settings are not ideal.
Fields to configure:
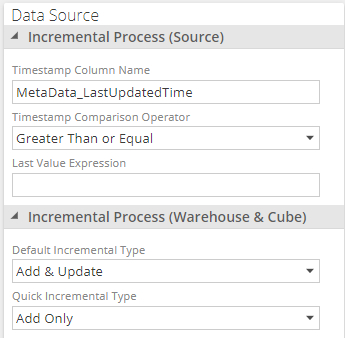
Incremental Process (Source)
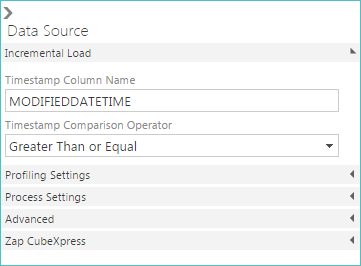
Timestamp Column Name. If the data source supports incremental loading, this setting specifies the column name used as a timestamp for each pipeline.
Timestamp Comparison Operator. This determines which data source rows are examined to determine if they are new. Two options are available:
Greater Than or Equal. This option is the safest, as it examines rows with a value in the timestamp column greater than or equal to the value of the highest value of the rows that were last loaded. Using this option guarantees that all new rows are found. For example, if a timestamp column has a resolution 1 minute, it is possible that the last incremental load did not load all the rows written during that minute. Using Greater Than or Equal ensures that all entries for that minute are re-examined. Any entries already loaded are ignored.
Greater Than. This option loads only entries with a value greater than the highest value that was last loaded. In timestamp-based columns, using this option risks missing entries. However, if the timestamp column is a batch identifier, and there are many rows in each batch, it may be safe to assume that all the rows from each batch are written together and were imported on the last load. Were Greater Than or Equal to be selected in this scenario, performance may be impacted if the batches contain many rows, as this would force all the entries from the last, previously-loaded, batch to be re-examined.
Last Value Expression. This option allows you to broaden the window for which incremental load will load data. When the source database is replicated and a data load runs against this replicated source, some records could be missed due to the replication still happening during the actual data load. This option allows you to define how the maximum/last value is derived. When left blank (the default setting), it uses MAX(@COLUMN). You can use @COLUMN to bind the timestamp column name in the expression.
Incremental Process (Warehouse and Semantic Layer)
The Default Incremental Type and Quick Incremental Type drop-down lists allow you to specify the incremental load behavior for the data source. These settings will also be inherited by all source table pipelines and source SQL pipelines originating from the data source.
The following options are available from both drop-down lists:
Add & Update. The default setting for the Default Incremental Type. When selected, all new data and any updates to existing data from all pipelines are added to the cube.
Add Only. The default setting for the Quick Incremental Type. When selected, only new data from all pipelines is added to the cube. No existing pipeline data is updated.
Synchronize deletes
If selected, only rows not previously loaded from the source are loaded into the warehouse table, saving processing time.
If the pipeline contains complex SQL steps or calculations that aggregate, you should disable this setting to ensure the warehouse table is populated correctly.
With many database-type data sources, (such as SQL Server), deleting rows from data tables is slow. To optimize performance, by default, when an incremental load is performed, only new rows are added and changed rows are updated.
Deleted rows are left in the table and are removed when the next full update is performed. However, other data sources, such as (e.g. CSV) may not have a similar performance cost for incremental deletes. If rows in the source table are deleted frequently, and the table is small, it may be worth selecting this check box.
Note
Depending on the source database structure, deleted rows may affect the accuracy of reports. To minimize this problem, you should perform a full load of the source data periodically to effectively remove the deleted rows. A full load can be achieved by creating a model process schedule with the Disable Incremental check box selected.
In some data sources, (e.g. CRM), this problem is alleviated by not deleting rows, but rather flagging them as disabled. In this case, the need for periodic full loads to maintain report accuracy is eliminated.
Add another data source
You can add data sources to your model using any of the following methods:
From the model Data Sources list
From an individual data source tab (when viewing that data source)
Both methods use a modified version of the model creation wizard to add the new data source.
Add a child data source
Data Hub provides the ability to merge source collections-of-tables (schemas) automatically. This is achieved with “child” Data Sources. Child Data Sources are added by clicking + Child Data Source on the CHILD SOURCES tab of an existing (parent) Data Source, as in the following image.
Rows for child pipelines are automatically unioned with rows of the matching parent Pipelines. In this way, complete schemas are merged. It is helpful to compare Schema Merge to Table Merge to aid in understanding both features.
Recall that Table Merge is configured with either the Add Pipeline as Union of Tables button or the Tables field from the SOURCE tab. Schema Merge differs from Table Merge as follows:
Automatic table matching. Schema Merge automatically determines which tables to combine into a single Pipeline by matching table names. Table Merge, on the other hand, requires the tables to be manually specified.
Cross-Data Source. Schema Merge works across Data Sources. Table Merge, on the other hand, combines tables within a Data Source.
Tables from a child source that cannot be matched to a parent’s table can be individually added as Pipelines. Sensibly such Pipelines are sourced solely from the child source.
If merged tables result in duplicate rows, you can use this option to include an additional key column. The included key column is based on the Code field specified for parent and each child Data Source.
One common requirement for child Data Sources is when the source system stores each company’s data in a different database. By choosing the primary company’s Data Source to be the parent, and then adding a child Data Source for each remaining company, it is possible to transparently combine company data to provide a single set of merged Pipelines. If you are connecting to a source known to store information in this way, Data Hub will automatically configure this tab for you.
If multiple Excel files exist (all with the same set of sheets), and you wish to combine each set of matching sheets into a Pipeline (e.g. each Excel file might have a sheet per region), you will need to configure the CHILD SOURCES tab manually.
While configuration of this tab is beyond the scope of this document, it is a relatively simple exercise given the material we have now covered. The important thing to keep in mind is that these capabilities are available to save you significant time, should you require them. And when you do, use the in-application hover-over tooltips and How-to guide as needed.
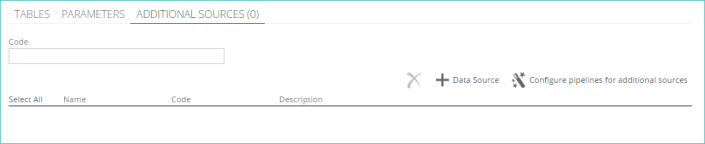
Data source parameters
Parameters are designed to compliment data source-specific parameters, such as those currently available via a CRM data source (viewable on the PARAMETERS tab when a CRM data source's tab is open). Parameters added to individual data sources can only be used in pipelines that originate from that data source.
Add parameters
Parameters can be added to a model or an individual data source. Once defined, they can then be used in SQL expressions when creating calculated columns in pipelines. You can add parameters to two different locations within a model, depending on the desired scope of the parameter:
Data source. Parameters added to individual data sources can only be used in pipelines that originate from that data source.
Data source-level parameters are added using the Parameters tab on an individual data source.
These parameters can be used in pipelines that originate from the specific data source.
Model Parameters list. Parameters added to this list are model-wide and can be used in any pipeline in the model.
View and edit parameters
Parameters are viewed in one of the following two areas:
In the Parameters list on a model tab
On the Parameters tab for an individual data source
The PARAMETERS tab displays data source-level parameters. You can edit the data type, value, and description of parameters using the corresponding columns in the list of parameters.

Note
Parameters that have a gray background cannot be edited.
Union sources
You can combine multiple pipeline source tables into a single pipeline using the source table union feature. You can manually combine (union) any table that exists in either the primary data source or in any additional data sources. The most common use of this feature is to combine corresponding tables from multiple companies into a single pipeline.
The source union action is performed by adding the additional pipeline tables to the Tables setting on the SOURCE pipeline tab.
This feature supports two scenarios: single data source and multiple data source.
Single data source
In the one data source there are multiple tables with the same schema, but different names — typically one for each company (named CompanyName.Tablename). You can union tables from different companies to have a single combined pipeline in the data warehouse. As the company tables have different names, you must manually add the appropriate tables to the pipeline.
The example below shows multiple tables containing address information that are combined into a single address pipeline. Initially, the EmployeeAddress pipeline is based on a single table. Additional tables may be added by typing their names, or clicking the + icon in the tag control.
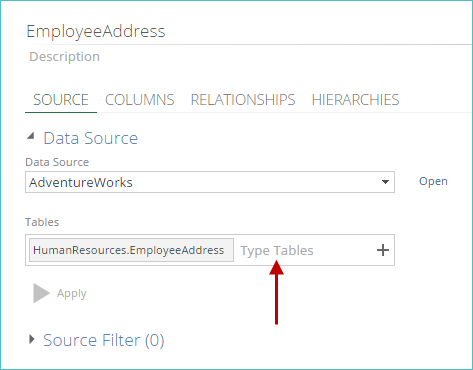
In the following example, several additional tables (each of which contains address information) have been added to the EmployeeAddress pipeline, which originally only included the HumanResources.EmployeeAddress table.
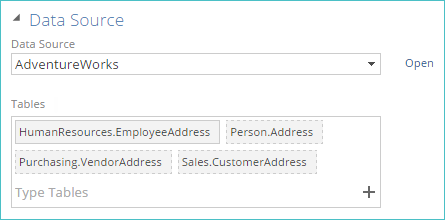
If more than one tag has been manually added to the Tables tag control, as shown above, the table tag that was added first uses a solid border. It is the primary source table. Other table tags use a broken-line border. A different primary source table can be specified by right-clicking a table and selecting Set Primary Table. The primary table is used to populate any captions in the cube.
If you change the defined tables, you must click the Apply button for the changes to take effect.
Multiple data source
The multiple data source is typically used to join data sources from different companies typically containing corresponding tables with the same name and schema.
Starting with one company's data source, you add other company data sources, as additional data sources. In each pipeline (based on the initial data source) you can union corresponding tables from these multiple separate data sources to create a single combined pipeline in the data warehouse.
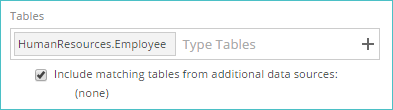
The Tables tag control initially displays the table in the currently selected data source, used for the pipeline.
If you have added additional data sources to the current pipeline data source , you can select the "Include matching tables from additional data sources" check box to have Data Hub automatically include any table in these additional data sources (that uses the same name as any tables currently listed in the Tables tag control).
In this scenario, the following behavior should be noted:
If any additional data sources are found to have matching table names, those data sources are listed directly below the check box. If a data source name appears in this list, it indicates that a table having the name shown in the Tables tag control in that data source is included in the pipeline source data. Otherwise, the (none) string is displayed (as shown above), meaning no matching tables have been found. ("Include matching tables from additional data sources" check box is selected by default.)
If only one tag has been added to the Tables tag control, the table in the initial data source will be the primary table. The primary table is used to populate any captions in the cube.
If the corresponding table in an additional data source has a different name to the one in the initial data source, it will not be included automatically. You may add it manually as a new tag by typing its name, or clicking the + icon in the tag control.
If more than one tag has been added to the Tables tag control, the table tag that uses a solid border is the primary source table. Other table tags use a broken-line border. A different primary source table can be specified by right-clicking a table and selecting Set Primary Table. The primary table is used to populate any captions in the cube.
You can add or remove tables using the tag control. If you change the defined tables, you must click the Apply button for the changes to take effect.
Note
If no additional data sources have been added to the data source used by the current pipeline, the "Include matching tables from additional data source" check box does not appear.
Ideally, when tables are unioned, their schemas (column names and data types) should match exactly. Should the schemas vary, Data Hub includes all columns from all the source tables. When a column is not present in all source tables, it will contain null entries in the rows from the source tables that do not contain it.
Once a new data source or table is selected for a pipeline, you may need to make changes to the columns listed in the COLUMNS pipeline tab to ensure they still match your requirements.