Resources
The term resource in Data Hub refers to various objects that are defined and used throughout the application.
Save, close, and delete
Save
Once a resource exists, you can use the Save As function to make a copy of it. You will need to change the name when doing this.
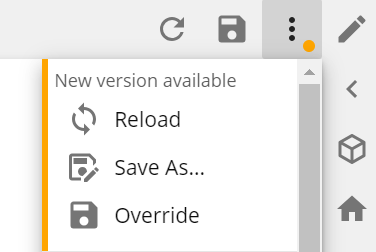
When more than one user is making changes to the same resource, various options are available when saving. Once another user has clicked save on their copy of the resource, you will be notified via a new version indicator shown on the ellipses menu. When clicking on the menu various options will be available:
 |
Reload will discard all your changes, and refresh your resource with the changes from the other user(s)
Save As will save a copy of your resource with your changes, without changing anything on the version the other user is working on.
Override will save your changes and override the changes any other user(s) has made.
Close
To close a resource, click the x on the right of the resource tab. When closing a resource with unsaved changes, a pop-up will be shown, prompting the user to save before closing.
Delete
You can remove a resource from a folder by clicking the ellipsis to the right of the resource and then clicking Delete.
You can select multiple resources by holding shift or ctrl while you click.
After you select the Delete function, a confirmation message appears, allowing you to verify the action for the selected items.
If you are deleting a data model, the Confirm Deletion dialog box now displays a message informing users that both the warehouse database and cube for the model will be deleted in a single action. In previous versions, the warehouse was deleted, but the cube was not.
Click Yes to confirm the action.
Important
If you are deleting a model, and any user-owned tables are found in the database, the entire database is not deleted. Instead, only tables added by ZAP Data Hub are removed, and the database is retained but with only the user-owned tables.
Rename and change descriptions
You can use the Rename button on the Folders ribbon to change the name of a resource. It also allows you to alter the resource's description, which appears adjacent to a resource's name in a folder, and add design notes (if applicable).
Note
You can also edit the name and description of a data model directly from the model's tab.
Select a resource using the checkboxes in the left column of a folder's tab, then click Rename on the FOLDER. You can only select and rename one resource at a time.
In the Name text box, change the resource's name.
(optional) Add a description for the resource, or edit the existing description, using the Description text box.
(optional) Edit or add custom notes to the resource using the Design Notes text box.
Click OK.
Important
Notes are not intended for consumer users (unlike the Name and Description properties) and are not visible in the Consumer view.
Cutting, copying, pasting
You can use the Cut, Copy, and Paste buttons on the Folders ribbon to move resources and create duplicates of resources within your Data Hub folder structure.
Once you select a resource or multiple resources, using the checkboxes in the left column of a folder's tab, you can move or duplicate the resource.
These options are similar to cut/copy/paste options available in other applications. The main difference being that, in Data Hub, they are only available when viewing the contents of a folder.
Viewing resource properties
Each resource contains properties that can be viewed (and a small subset can also be edited). Properties information includes general information (such as resource name and creation/modification information), currently defined module tags, related resources (both dependent and supporting), and user access settings.
To view resource properties:
Open the resource's properties screen using one of the following methods:
With the resource already opened in a separate tab (via the Resource Explorer), click the Properties button.
Right-click the resource in the Resource Explorer and select Properties from the menu that appears.
Edit the following properties, if desired:
Name - The name of the resource, as it appears in the Data Hub application.
Description - Detailed information about the resource, which is visible when viewing a list of resources in a folder.
Edit or add custom notes to the resource using the Design Notes text box.
Use the Tags text box and corresponding Auto-complete tags under this resource check box to assign tags to the resource. These tags can be used to add the resource to a module. For more information on adding tags, see Assigning Tags to Resources. For more information on the Auto-complete tags under this resource check box, see About Tag Scope.
If desired, review the following properties. (These properties cannot be edited):
Resource Id - Unique number for each resource.
Type - The category of the resource as defined in Data Hub, such as analysis, folder, etc.
Created - The user who created the resource and the date and time (UTC) when the resource was created.
Last Modified - The user who last changed the resource and the date and time (UTC) when the resource was last changed.
Resource Path - The path to the resource appears in the Resource Explorer, prefixed with the organization name. This entry is useful when working with resources using the ZAP Data Hub API.
Portal Url - A link to the resource's page within the Data Hub application. This link can be copied and emailed to allow another user to easily open the resource in Data Hub to view and edit the content or provide support.
Resource Viewer URL - A link to a stand-alone web page displaying the resource. This link is typically used to integrate the display of a Data Hub resource into another application, such as AX or Sharepoint. The web page allows the resource to be viewed but not edited.
Used By - Displays all dependent resources – resources that depend on the current resource for their data or appearance. Entries in the table can be clicked to open the corresponding resource.
Uses - Displays all the supporting resources – resources that the current resource depends on for its data or appearance. Entries in the table can be clicked to open the corresponding resources.
Users with Access - Displays the list of users who have access to the resource and their effective access level.
Click Save.
Important
Notes are not intended for consumer users (unlike the Name and Description properties) and are not visible in the Consumer view.
Summary and compare
Viewing a Resource's Summary
You can use the summary feature to view a condensed report (on a single, separate tab) that contains information about a specific resource.
In addition, the separate tab that appears, and contains the summary information, also grants access to the compare feature.
Accessing the Summary Feature
A resource's summary information can be accessed using any of the following methods:
From a folder - Select the resource whose summary you want to view, click the ellipsis and select Summary.
From an individual resource tab (when a single resource is being viewed): Click the ellipsis at the top right of the resource and select Summary.
From the right-click menu: Right-click a resource in the Resource Explorer and select Summary from the menu that appears.
Viewing the Generated Summary Information
Once accessed, the summary information itself appears on a separate Summary tab.
In the following example, a data model's summary is displayed.
In most cases, the following information is displayed in summary:
Name and location of the resource.
A Compare placeholder for dragging and dropping a different resource for comparison purposes (as described Comparing Resources).
Various resource details. These vary between resource types and may include the following:
Cube connection information
Any defined module tags.
Placeholder specifications (slicers, columns, rows, etc.)
(Data models only) Model-specific details (data sources, pipelines, etc.)
(Solution resources only) The contents of the solution's development folder as described in Viewing a Solution Resource's Summary.
Some entries in the list of details can be expanded, by clicking the corresponding arrow icon, to display additional information, as shown below.
Only the sections marked with the expand and collapse icons are affected by these buttons. Other areas of the summary will be unchanged when these buttons are clicked.
Comparing Resources
You can compare resources (including data models, analyses, etc.), allowing you to see the differences between two specific resources easily.
This new feature can be useful in the following scenarios (when you need to compare two versions of a resource):
Staging to production. Comparing a development version to an existing production version.
Team working on a model. Comparing the current version to a published version.
Comparing Resources: Summary Tab Method
You can compare two resources, even one created in a different Data Hub instance, by first opening one resource's Summary tab and then dragging and dropping another resource into the tab's Compare placeholder.
Open one of the two resources that you want to compare.
Open the Summary for the resource.
If you want to compare the current resource with a resource from a different Data Hub instance (via an exported .zap file), click the Select File button and navigate to the exported resource. You will need to export the resource before selecting it for comparison, as described in Exporting a Resource Package.
If you want to compare the current resource with another resource in the current instance of Data Hub, perform the following steps:
Locate the other resource (the one whose summary is not displayed) in the Resource Explorer.
Drag the resource from the Resource Explorer into the Compare placeholder near the top of the open resource's Summary tab. In the following example, two analyses are being compared.
Once the comparison is complete, review the information on the tab. For more information, see Viewing Resource Comparison Results.
When you are done viewing the comparison information, close the Comparing tab.
Note
The compare process is automatically initiated once you add the second resource to the Compare area. Once the process is complete, a Comparing tab appears, showing you the differences between the two resources.
Viewing Resource Comparison Results
Once you run the comparison, the results are displayed on a separate Comparing tab.
Although the displayed results will differ, based on the type of resources compared (in the example above, two analyses are being compared), the following general information and options are available:
At the top of the tab, the compared resources are listed and their resource type and location in your folder structure.
Immediately below this list of resources are the differences found between the two. The displayed information, and the overall amount of information, will vary between comparisons, as it is based on the types of resources selected and the number of differences found.
View all unchanged model items by clicking the Hide unchanged button on the HOME ribbon. By default, only items that are different (changed) are shown.
Switch the position of the resources using the arrow buttons to the right of the resource list.
Some entries in the list of details can be expanded for model resources by clicking the corresponding arrow icon to display additional information, as shown below using a Date pipeline.
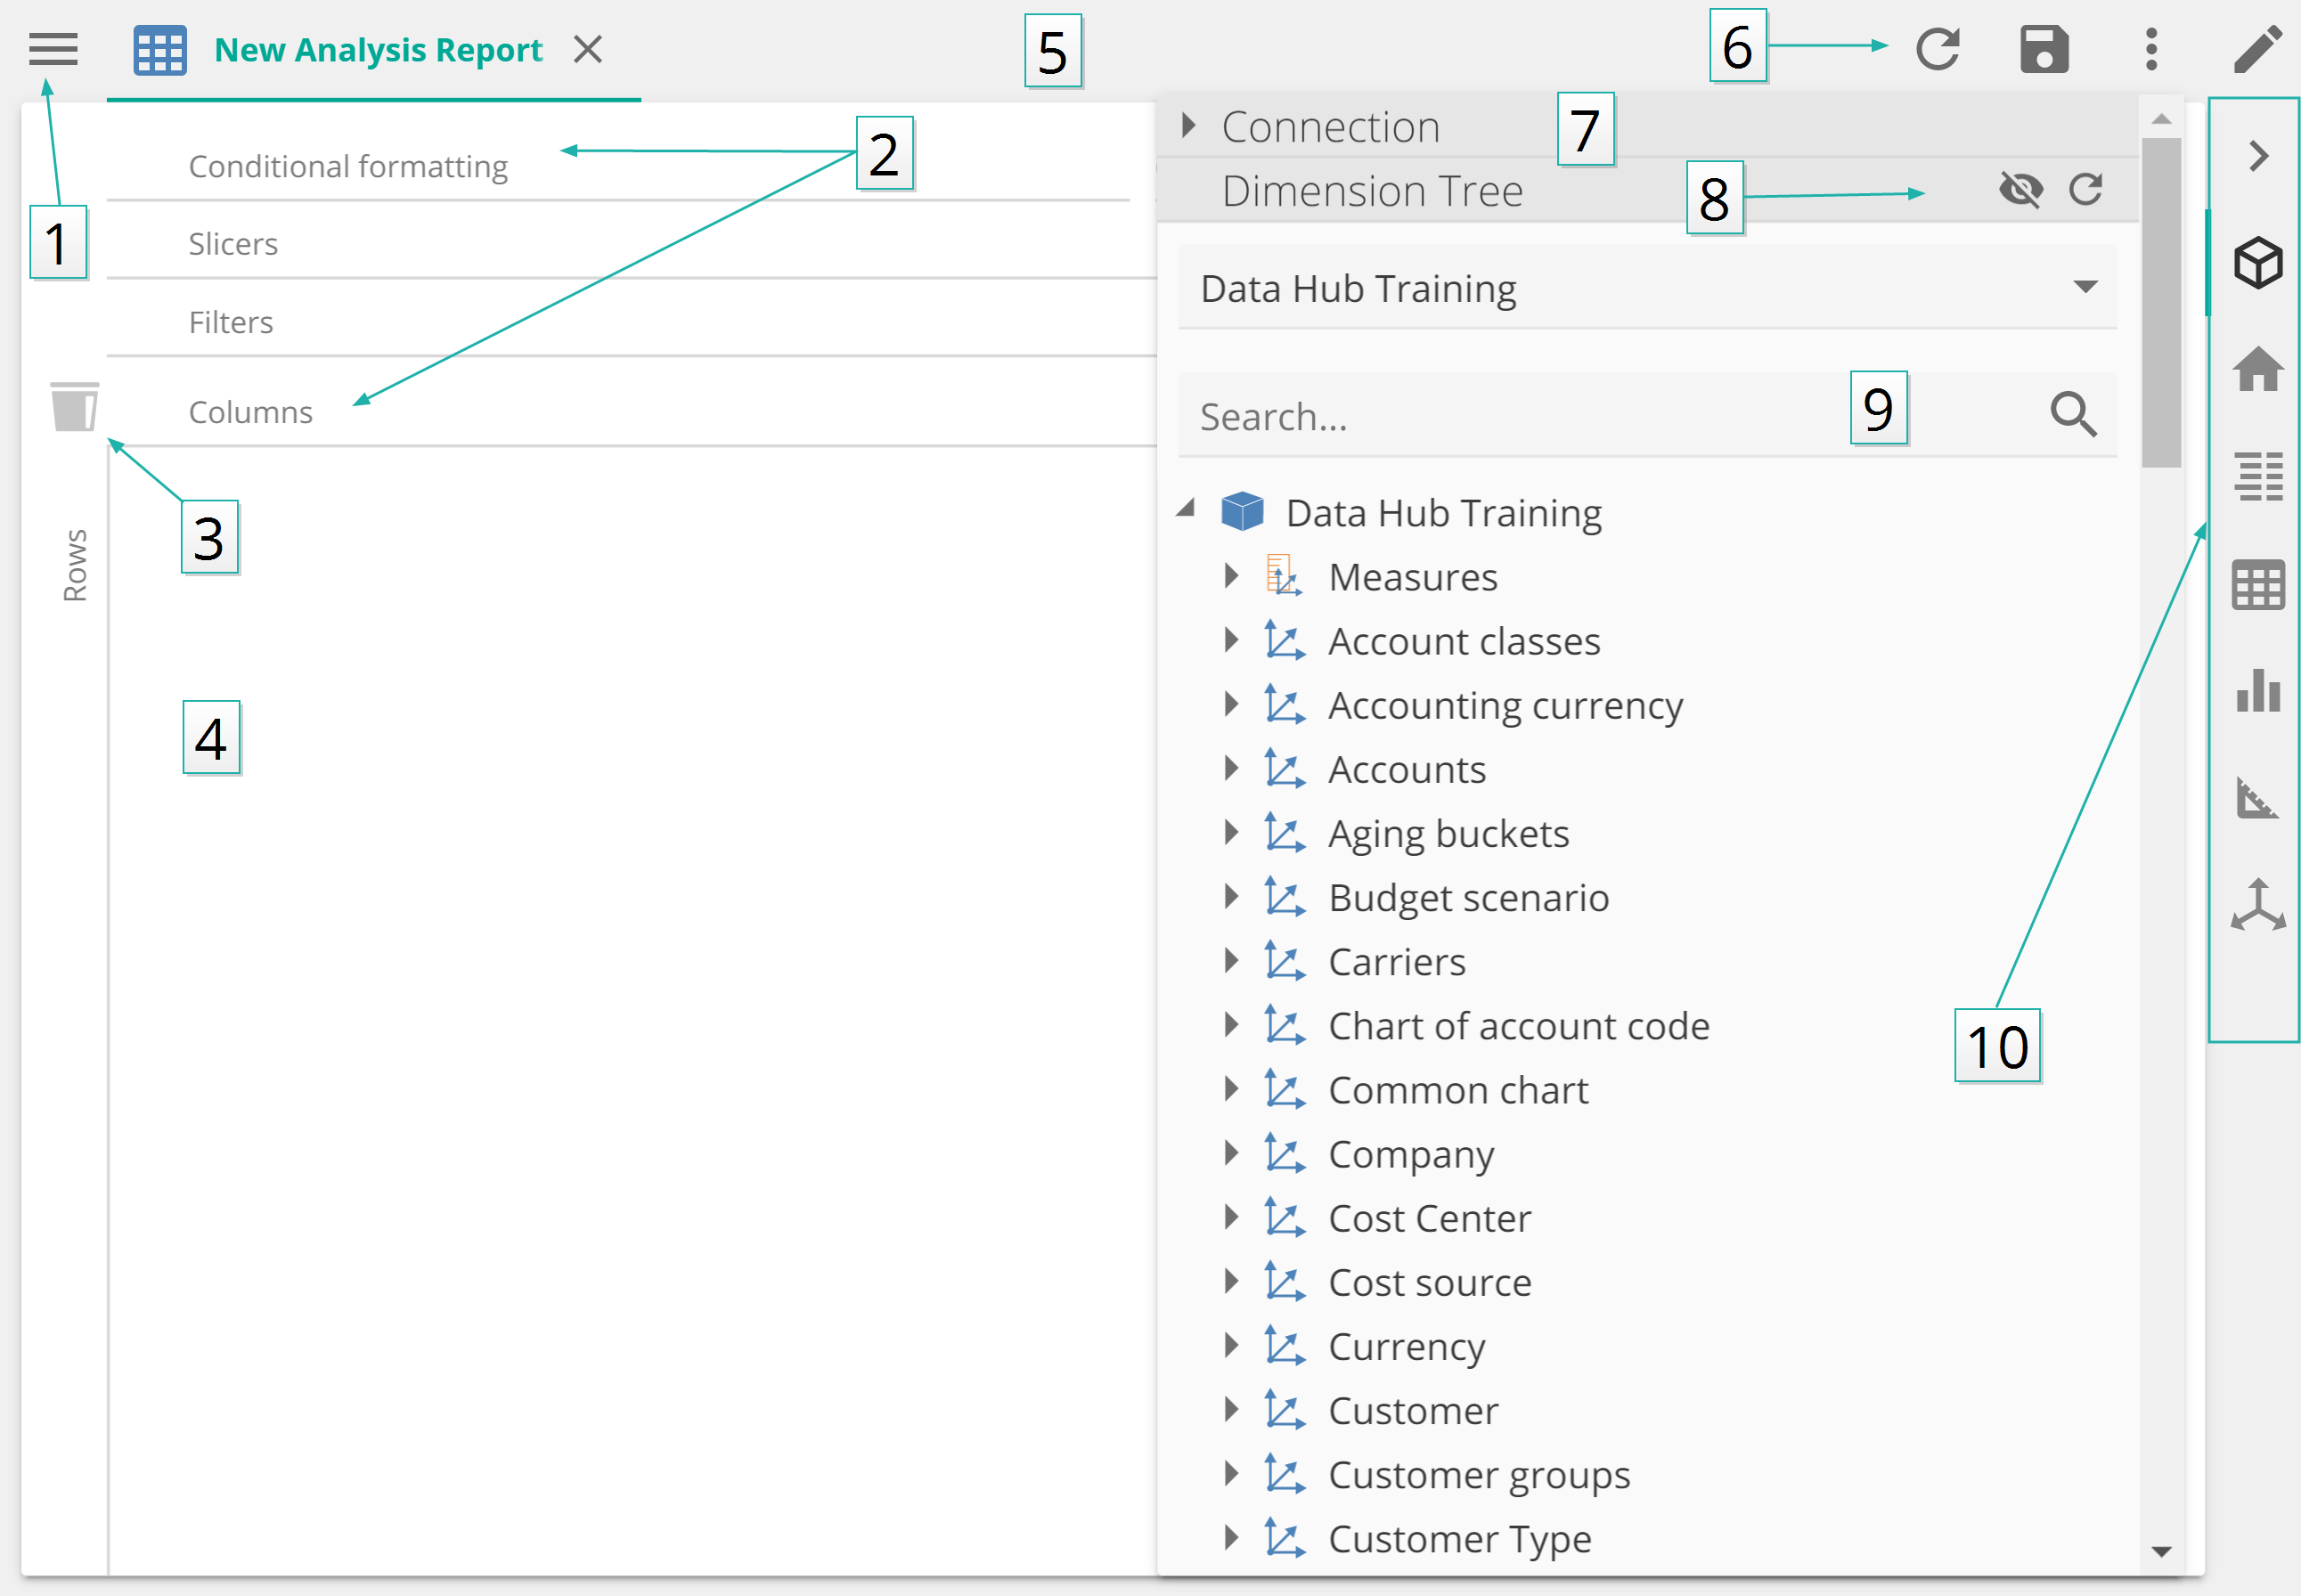
Design canvas

Resource Explorer
Placeholders
Drag items into the bin to remove from the analysis
Design canvas
Toolbar
Toolbar tools
Connection details
Filter or refresh the Dimension Tree
Search the Dimension Tree
Design bar with tabs relevant to the selected resource