Data Hub with Analytics
Installation
Download
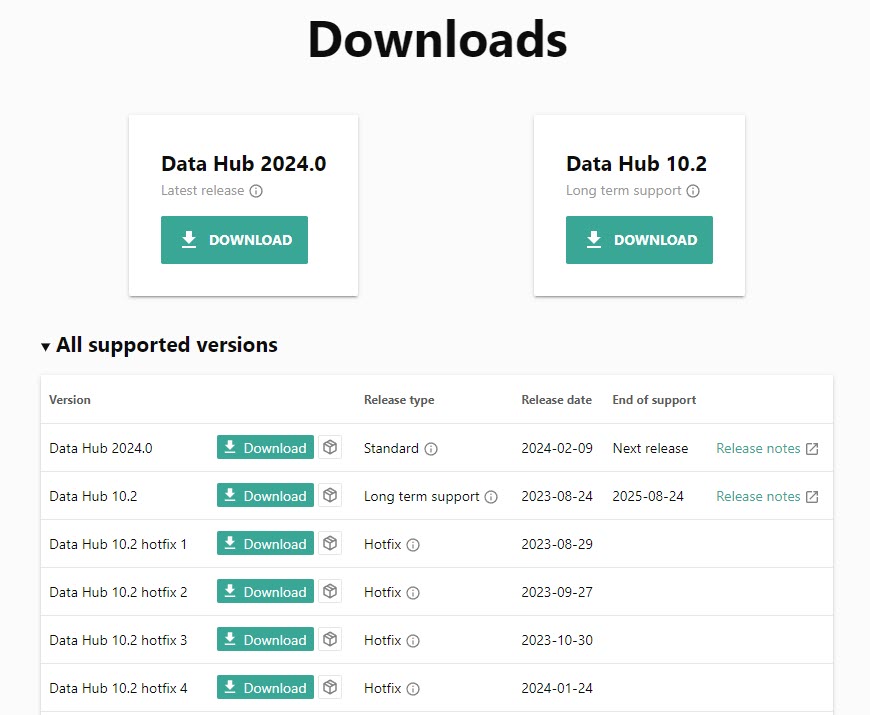
Download Data Hub from this location.
 |
Note
Versions:
Version numbers starting with the year, trailed by a number is the monthly versions.
Data Hub 10.2 and so forth is the version release twice yearly that has long term support.
Release Types:
Standard: These releases provide access to all the latest features, but are only partially supported once the next release comes out.
Long Term: These releases are fully supported for 2 years, but no new features will be added during this time in this release.
Hotfix: Address specific issues and are fully supported, provided the version they're based on is supported, but these are not recommended for general use.
Important
Ensure you understand the System Administrator role prior to proceeding. The first user of Data Hub after installation will be assigned as the System Administrator for this instance of Data Hub and this role cannot be changed later.
Note
ZAP partners, staff, and participants in the early adopter program may have access to different versions of the installation files. Contact ZAP Support for additional instructions.
Hot fixes are not available on the ZAP Support Center website. If you require a hot fix to correct a specific issue, log a ticket with the ZAP Support website.
System Administrators
Data Hub has a global role: System Administrator. This role is given unlimited access to all resources across all organizations, and to additional application and license settings. The System Administrator role cannot be edited or deleted, and no additional roles may be created in the Global policy. See System administrators for details.
Automatically configured System Administrator users
The user who first runs ZAP Data Hub after it is installed is automatically assigned the system administrator role in the global policy.
Note
If you are a system administrator, you can create additional system administrators.
By default, the user who first runs Data Hub, is also assigned the Administrator role for the Default Organization policy. This enables them to administer the Default Organization, even if they are later removed as a system administrator.
User role management
System administrators can check the quotas for each role type allowed by their license the number of users allocated to each role using the Licenses link on the Settings tab.
System administrators and organization administrators can also check the number of users allocated to each role type using the User Profiles link on the Settings tab.
Installing Data Hub
On the intended ZAP Data Hub host device:
Navigate to the downloaded installation file ZAP Data Hub <version> Setup.exe, and double-click the file to start the installation wizard.
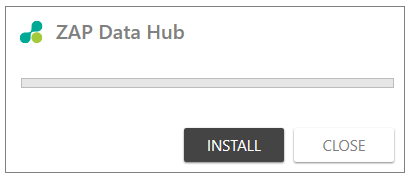
Click INSTALL
If a User Account Control dialog box appears, click Yes. The Data Hub Website Administration Configuration Window is shown while the required Windows components are installed and configured. Expand the Deployment log link at the bottom of the window to see the progress and tasks of the installation process.
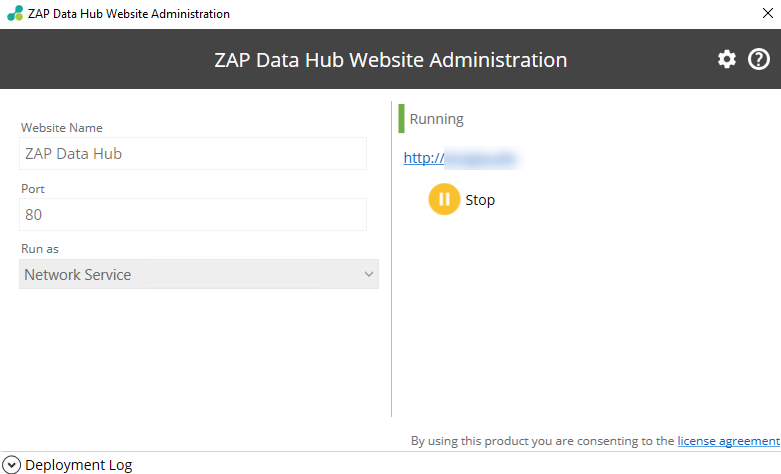
Once the Windows components are installed and configured, the Data Hub Website Administration screen with show the following default values:
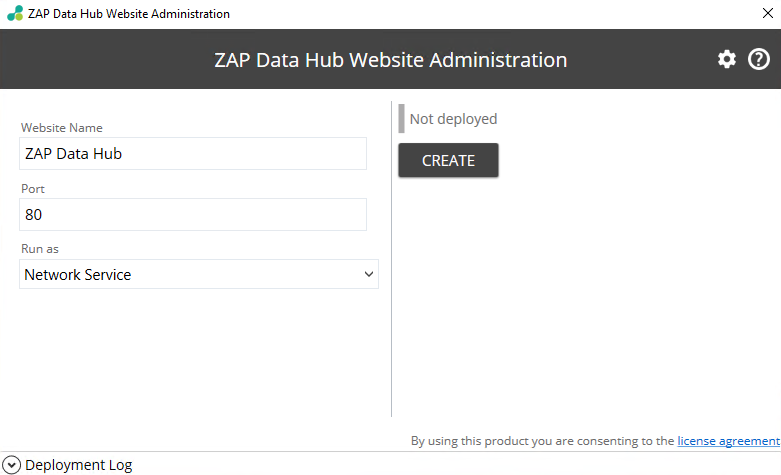
Website Name. The name of the Data Hub application (website) as it will appear in the Microsoft Internet Information Services (IIS).
Port. The port number that will be bound to HTTP on the specified website. The default value is 80 (or 8110 if port 80 is already in use).
Run as. The Identity (user account) to use for the Windows application pool. The following options are available:
Network Service. The Windows Network Service Account is used. This option is recommended where practical.
Windows Account. If the NetworkService Account is not suitable, (for example: due to unsuitable permissions or company policy), you may specify a Windows user name and password to use for the application pool identity.
You can review the Data Hub license by clicking the license agreement link in the lower right corner of the dialog box.
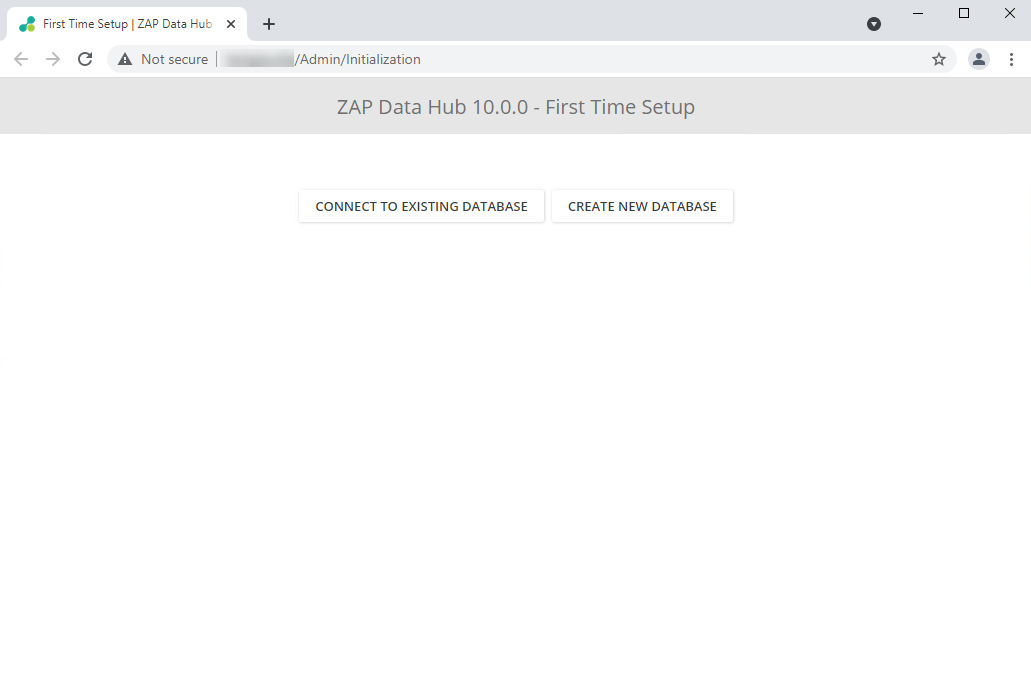
Click CREATE. The Data Hub website is created and the configuration wizard's First Time Setup screen appears in your default browser.
Return to the Data Hub Website Administration dialog box. The URL for your installation is displayed, along with the current status of the application (Running) and the option to stop the application.
Note
You can use this dialog box to stop the application (website), access log files, or view your system's IIS interface.
Close the Data Hub Website Administration dialog box.
Prerequisites
The host device runs:
Microsoft Internet Information Services (IIS Server).
Microsoft SQL Server.
Microsoft SQL Server Analysis Services.
Data Hub.
And the host device requires access to:
desired data sources.
direct access to the internet.
Active Directory Domain Service or an alternative supported authentication service.
Hardware and Software
Hardware
Processor1 | A four or more core Xeon, 2 2.6 GHz or better, with access to 3 GHz or better turbo modes (four cores per 200 licensed consumer users). | ||||||||||||||||||||||||||||||||||||||||||||||||
Memory 3 | At least 20 GB for data sources up to 250 GB, between 20 GB and 32 GB for data sources between 250 GB and 500 GB, and between 32 GB and 64 GB for data sources between 500 GB and 1 TB. In each case, the specified memory must be available to the required software components, specified below. Note: There is a minimum of 2 GB per core. For source databases over 1 TB, please check the environment requirements with your Data Hub consultant. | ||||||||||||||||||||||||||||||||||||||||||||||||
Storage 4 | A high speed, solid-state drive with 25-50% of the source database size free. | ||||||||||||||||||||||||||||||||||||||||||||||||
1The number of cores is directly proportional to the number of concurrent users Data Hub can support. For user counts, it is assumed that 10% of licensed consumer users are active (logged in to Data Hub at any one time). Of these, it is assumed 10% will be concurrently loading a report at any one time. Using these assumptions, and assuming moderate-complexity reporting, two cores should satisfy 100 users. Having a high proportion of design users (more than 10%) will significantly affect these estimates. ImportantUnder-specifying the storage size or speed will dramatically degrade performance. Processing will take much longer or may fail. 2The processor specification is a guide only. Any processor with equivalent capacity is acceptable. 3Memory usage is directly affected by the reporting profile, the cube structure and, for processing, the volume of data. It is recommended configuring the Maximum Server Memory setting of SQL Server. For most systems, around 50% of the total server memory is appropriate. ImportantUnder-specifying the memory will dramatically degrade performance. Processing will take much longer or may fail. 4The combined size of Data Hub’s standard staging database, cube, and the Data Hub metabase database usually fall in the range of 25 to 50% of the source database size. Data Hub installations that are highly customized (for example with additional tables added from a Microsoft Dynamics database or other data source) can increase the storage requirements considerably. ImportantUnder-specifying the storage size or speed will dramatically degrade performance. Processing will take much longer or may fail. | |||||||||||||||||||||||||||||||||||||||||||||||||
Note
For user counts over 1000, or source databases over 1 TB, please check the environment requirements with ZAP’s consulting team.
Software
Operating Systems | Windows Server (version 2016 or higher) | ||||||||||||||||||||||||||||||||||||||||||||||||
SQL Server | Microsoft SQL Server 2016 13.0.6435.1 or newer with the latest service packs and cumulative updates installed. SQL Server versions and latest updates1An instance of Microsoft SQL Server Analysis Services installed in Multidimensional mode. Minimum SQL Server edition required is 2016 Standard edition. (Express edition not supported). NoteIf columnstore indexing is enabled, and data types of varbinary(max) or varchar(max) are larger than 4000, SQL Server 2017 is required. | ||||||||||||||||||||||||||||||||||||||||||||||||
IIS | IIS Is installed automatically as part of the Data Hub installation. | ||||||||||||||||||||||||||||||||||||||||||||||||
Microsoft .NET Framework | .NET 4.8 is required to be installed manually prior to installing Data Hub v10, if not installed on the server before. Internet access to Microsoft is needed to download the installation files. Installations of Data Hub 9.2 and older will install the required .Net framework automatically as part of the installation. | ||||||||||||||||||||||||||||||||||||||||||||||||
1It is strongly recommended ensuring that all instances of SQL Server have the latest relevant CU applied. SQL Server Cumulate Updates (CUs) contain a rollup of previous hotfixes (but no new features) and are released on a regular, frequent schedule. | |||||||||||||||||||||||||||||||||||||||||||||||||
Server Performance Recommendations
The following hardware items and settings may improve report loading performance. The items are presented in approximate order of impact.
Top 5 Recommendations for Processing Performance
The following hardware items and settings may improve model processing performance (both warehouse and cube). The items are presented in approximate order of impact.
Providing a high-speed, solid-state drive for the computer hosting the data warehouse and cube.
Providing four or more high-frequency cores (2.6 GHz or better with access to 3 GHz or better turbo modes) for all computers.
Note
Four cores perform 1½-2 times faster than two cores, depending on the complexity of calculations in the model.
Providing adequate RAM (20 GB per 250 GB of source) and configuring the SQL Server Maximum Server Memory setting appropriately.
Setting the Windows power plan to High performance.
In a virtualized environment, meeting the CPU core requirement for each server without over-allocation of the physical cores (for more information, see Virtualization ).
By following the recommendations above to optimize the configuration, Data Hub can be expected to process a moderately complex ERP model with a 250 GB source in 1½-3 hours.
Important
Under-specifying the CPU will degrade performance at least linearly with respect to CPU speed and core count. This may lead to significant increases in processing time. Under-specifying the memory or disk storage (size or speed) will dramatically degrade performance. Processing will take much longer or may fail.
Top 5 Recommendations for Report Performance
Providing high-frequency cores (2.6 GHz or better with access to 3 GHz or better turbo modes) for all computers.
Note
Report load times scale near-linearly with CPU core frequency.
For high user count implementations, providing adequate cores (two cores per 100 licensed consumer users).
Setting the Windows power plan to High performance.
Scheduling background tasks (model processing and publication rules) to avoid periods when analytics are being designed or viewed, or providing a separate background task server to handle them (see the configuration described in Two-Tier for details on implementing a separate background task server).
In a virtualized environment, meeting the CPU core requirement for each server without over-allocation of the physical cores (for more information, see Virtualization).
Other recommendations for Performance
If you use anti-virus software, make sure you exclude appropriate folders and files for Data Hub, the .NET framework, and SQL Server from virus scanning. This improves performance and makes sure the files aren't locked by the virus scanner when they are needed.
AntiVirus-Exclusion-Recommendations-for-ZAP-BI-and-SQL
Note
Knowledge Base articles, can be located on the ZAP Support website, which requires a log in.
For more detail, see the following article in the Data Hub Knowledge Base:
The following settings may be altered to reduce the effect of model processing on reporting performance:
Data Hub Application Settings
Reduce the Maximum Simultaneous Background Tasks setting.
For more information, see the Background Tasks group in Using the Application Tab.
Data Hub Model Processing Settings
Reduce the Max source reading operations setting.
Reduce the Max result writing operations setting.
For more information on these settings, see Setting Model Processing Properties.
SQL Server Analysis Services Settings
Reduce the IOProcess\MaxThreads setting.
Reduce the Process\MaxThreads setting.
Note
See http://msdn.microsoft.com/en-us/library/ms175657.aspx for details of these settings.
Virtualization
Data Hub is fully supported in virtualized environments. Performance is subject to a small falloff, consistent with the virtualization software provider’s guidance (for example, 10% for Microsoft Hyper-V).
Over-allocation and Relative Weighting
Over-allocation (also known as over-subscription) is a mechanism that allocates resources to the virtual environments that total to more than the physical resources available. Over-allocation is one of the most common causes of Data Hub underperformance.
It is strongly recommends against running Data Hub within a processor or RAM over-allocated environment. This includes not relying virtual memory to fulfill memory requirements.
Hyper-threading
Hyper-threading does not provide a significant benefit for Data Hub processing over the number of physical cores allocated. recommends allocating the required number of physical cores to Data Hub.
High-availability
For high-availability requirements, it is recommended to configure an IIS web farm.
Additionally, clustering techniques can be used to ensure high-availability of the SQL Server components. Please contact ZAP to further discuss your high-availability requirements.
Required Outbound Internet Connectivity
Some Data Hub features need outbound internet connectivity to operate. If you are operating in an environment where outbound connectivity is controlled, you will need to make appropriate settings in your organization's firewall to ensure Data Hub has the required access. The following information lets you decide the appropriate firewall settings.
Data Hub outbound requests come from the following two server processes:
IIS (C:\Windows\System32\inetsrv\w3wp.exe)
C:\Program Files\ZAP Data Hub\bin\phantomjs.exe.
The TCP protocol is used on ports 443 and 80.
The table below shows which URLs are accessed.
Feature | Description | URL |
License Retrieval and Solution Management | Highly Recommended. Without this access, Data Hub licenses cannot be retrieved using a license key. | https://services.zapbi.com/ (Data Hub version 7.1 and newer) |
Map Provider (for example, Mapbox). | Mandatory when using the Map chart types. The map visualization will not work otherwise. Connections may be made from the Data Hub server (or from any node if a web farm is used), or from client computers. | If using Mapbox (the default), the URL is *.mapbox.com. If using another map data provider, consult the data provider's documentation. |
Model Data Sources | Mandatory when connecting to online data sources, such as Toggl, Zendesk, and salesforce.com. Connections are only made from the Data Hub server computer. | See the data source connection details Data source listing and review the source application documentation for information. |
Configuring a new installation
On the Data Hub host device:
Return to the First Time Setup screen. If you closed your browser since the installation, open a new browser and navigate to http://website name:<PORT>/Admin/Initialization, where <PORT> is the port provided during installation.

Click CREATE NEW DATABASE.
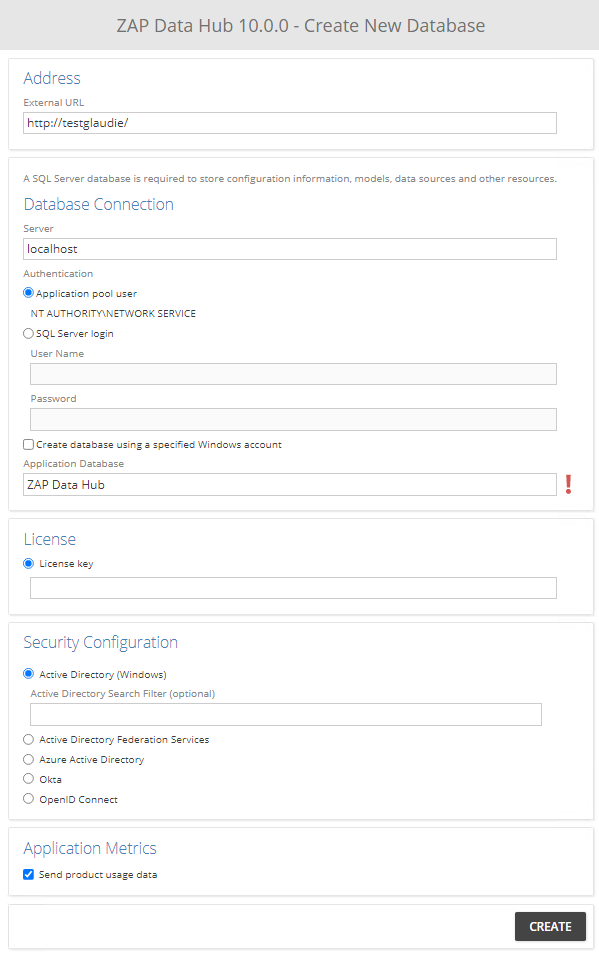
Specify the following settings which are necessary when creating the new Data Hub database:
External URL. use this test box to specify the URL that will be used to access Data Hub from any client computer. The default value provided can be retained if desired.
Server. Use the server name if the Microsoft SQL Server instance is on the same network as the Data Hub server. Otherwise, a fully-qualified domain name (FQDN) is required.
Authentication. Depending on how your Microsoft SQL Server is configured. authentication credentials are provided by either:
Windows Authentication - Select to use a Windows user name and password to connect to the the Microsoft SQL Server. Active Domain credentials are also accepted.
SQL Server Authentication - Select to use SQL Server user name and password to connect to the Microsoft SQL Server.
Create database using a specified Windows account. To run Data Hub as a specified Windows user, check this option and provide the login credentials. By default, Data Hub operates under the Windows application pool (NT AUTHORITY/NETWORK SERVICE). If the application pool identity doesn't have permissions to create SQL Server databases, the database creation step will fail.
Application Database. Specify the name of the new Data Hub database. The name you enter is checked against any existing databases on the selected server. If the name is unique, as green check mark appears to the right of the text box.
License. Enter the license key purchased for the instance being installed. The key is provided by either a ZAP account manager or partner, or the ZAP Support Centre website. Once the key is verified, a green tick will appear.
Security Configuration. Section allows you to specify the type of user authentication used with this instance of Data Hub.
Click CREATE. The Add New Organization screen appears.
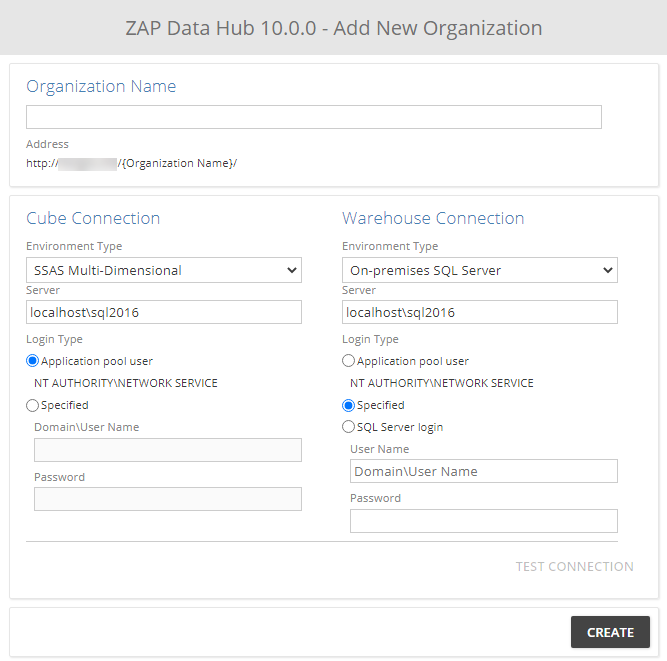
In the Organization Name text box, type the name of the new organization.
In the Cube Connection area, specify the server name (Server text box) and one of the following authentication methods for SQL Server Analysis Services (SSAS):
Environment Type.
None - Select this option for Data Hub warehouse-only deployments and Tableau-enabled Model Servers
SSAS Multi-Dimensional. Select
Appendix
Required Server Roles, Features and Internet Information Services (IIS) Configuration Settings
When configuring a server for use with Data Hub, several settings must be enabled for Internet Information Services (IIS) to function correctly. The procedure for accessing these settings varies based on your operating system (as described below).
Windows Server 2016
The required settings are enabled using the Select Role Services dialog box.
Verify that you are logged in as an Administrator or a user with administrative privileges.
Click the Server Manager icon on the task bar.
In the Server Manger dialog box, click the Add roles and features link.
If the Before you begin screen appears, click Next.
Select the Roles-based or Feature-based Installation option, and click Next.
Select the server to configure. The current server is selected by default. Click Next.
On the Select server roles screen, select the Web Server (IIS) checkbox if it is not already selected. This adds the IIS role.
Expand the Web Server (IIS) node, then expand the Management Tools node.
Expand the IIS 6 Management Compatibility node.
Verify that the following settings are selected:
IIS 6 Scripting Tools
IIS 6 WMI Compatibility
IIS 6 Metabase compatibility
Note
Selecting IIS Scripting Tools first will display a pop-up screen offering to install the other two items at the same time. Click Add Features to proceed.
Under the Web Server (IIS) node, expand the Web Server node then expand the Application Development node.
Verify that the ASP.NET 4.6 setting is selected, select it if needed.
Under the Web Server (IIS) node, expand the Web Server node, then expand the Security node.
Verify that the Windows Authentication setting is selected, select it if needed.
Click Next to display the Select features screen.
Click Next, then click Install to close the dialog box and save your changes.
Windows Server 2012 or 2012 R2
The required settings are enabled using the Select Role Services dialog box.
Verify that you are logged in as an Administrator or a user with administrative privileges.
Click the Server Manager icon on the task bar.
In the Server Manger dialog box, click the Add roles and features link.
If the Before you begin screen appears, click Next.
Select the Roles-based or Feature-based Installation option, and click Next.
Select the server to configure. The current server is selected by default. Click Next.
On the Select server roles screen, select the Web Server (IIS) checkbox if it is not already selected. This adds the IIS role.
Expand the Web Server (IIS) node, then expand the Management Tools node.
Expand the IIS 6 Management Compatibility node.
Verify that the following settings are selected:
IIS 6 Scripting Tools
IIS 6 WMI Compatibility
IIS 6 Metabase and IIS 6 configuration compatibility
Under the Web Server (IIS) node, expand the Web Server node then expand the Application Development Features node.
Verify that the ASP.NET 4.5 setting is selected, select it if needed.
Under the Web Server (IIS) node, expand the Web Server node, then expand the Security node.
Verify that the Windows Authentication setting is selected, select it if needed.
Click Next to display the Select features screen.
Click Next, then click Install to close the dialog box and save your changes.