Web farms
A web farm lets you spread the task of handling user requests to the Data Hub website across two or more servers to improve performance.
From the Data Hub perspective, a web farm consists of multiple web servers running the Data Hub application that use the same Data Hub metadata database. Settings in Data Hub let you configure the web farm. Various settings in Internet Information Services (IIS) and elsewhere must also be configured.
A web farm configuration is appropriate for large enterprise deployments.
Web farm deployment prerequisites
This configuration separates out the reporting and design servers (for building analytics and models, and for viewing analytics) from the model processing servers (for building cubes and batch emailing). All-in-One servers are also compatible with a web farm configuration, depending on your modeling and reporting requirements.
Reporting and design server prerequisites
One or more
reporting and design servers hosting:
Microsoft Internet Information Services (IIS Server).
Data Hub (to respond to the reporting load).
Reporting and design servers require access to:
Desired data sources.
Direct access to the internet.
Active Directory Domain Service or an alternative supported authentication service.
All-in-One Data Hub deployments can also be included in a web farm.
Hardware | |
Processor | A four or more core Xeon, 2.6 GHz or better, with access to 3 GHz or better turbo modes (four cores per 200 licensed consumer users). |
Memory | At least 8 GB (2 GB per core), available to the required software components specified below. |
Storage | No storage requirements |
Note
For user counts over 1000, please check the hardware requirements with the Data Hub consulting team.
Software | |
Operating System | Windows Server (version 2012 R2 or higher). |
IIS | IIS 8 or later, configured with the settings as detailed in Required Server Roles, Features, and Internet Information Services (IIS) Configuration Settings. |
Microsoft .NET Framework | The .NET framework is installed by the Data Hub installer if needed. Internet access to Microsoft is needed to download the installation files. |
Background task processing server prerequisites
One or more background task processing servers hosting:
Microsoft Internet Information Services (IIS Server).
Data Hub (for background task processing).
Microsoft SQL Server (ZapBI and warehouse databases).
Microsoft SQL Server Analysis Services.
Background task processing servers require access to:
Desired data sources.
Direct access to the internet.
Active Directory Domain Service or an alternative supported authentication service.
Hardware | |
Processor | A four or more core Xeon, 2.6 GHz or better, with access to 3 GHz or better turbo modes (four cores per 200 licensed consumer users). |
Memory | At least 20 GB for data sources up to 250 GB, between 20 GB and 32 GB for data sources between 250 GB and 500 GB, and between 32 GB and 64 GB for data sources between 500 GB and 1 TB. In each case, the specified memory must be available to the required software components, specified below. NoteThere is a minimum of 2 GB per core. For source databases over 1 TB, please check the environment requirements with your Data Hub consultant. |
Storage | A high-speed, solid-state drive with 25-50% of the source database size free. |
Software | |
Operating System | Windows Server (version 2012 R2 or higher) |
SQL Server | Microsoft SQL Server 2014 or newer with the latest service packs and cumulative updates installed. An instance of SQL Server Analysis Services installed in Multidimensional mode. The minimum SQL Server edition required is Standard edition (Express edition not supported). |
IIS | IIS 8 or later, configured with the settings as detailed in Required Server Roles, Features, and Internet Information Services (IIS) Configuration Settings. |
Microsoft .NET Framework | The .NET framework is installed by the Data Hub installer if needed. Internet access to Microsoft is needed to download the installation files. |
Footnotes:
NLB load sharing is recommended for web farming. For more information on configuring a web farm, refer to the following Knowledge Base article:
The number of cores is directly proportional to the number of concurrent users Data Hub can support. For user counts, it is assumed that 10% of licensed consumer users are active (logged in to Data Hub at any one time). Of these, it is assumed 10% will be concurrently loading a report at any one time. Using these assumptions, and assuming moderate-complexity reporting, two cores should satisfy 100 users. Having a high proportion of design users (more than 10%) will significantly affect these estimates.
Important
Under-specifying the storage size or speed will dramatically degrade performance. Processing will take much longer or fail.
The processor specification is a guide only. Any processor with equivalent capacity is acceptable.
Memory usage is directly affected by the reporting profile, the cube structure, and, for processing, the volume of data. Configuring the Maximum Server Memory setting of SQL Server is recommended. For most systems, around 50% of the total server memory is appropriate.
Important
Under-specifying the memory will dramatically degrade performance. Processing will take much longer or fail.
The combined size of Data Hub's standard staging database, cube, and Metabase database usually fall in the range of 25 to 50% of the source database size. Data Hub installations that are highly customized (e.g. with additional tables added from a Microsoft Dynamics database or other data source) can increase the storage requirements considerably.
Important
Under-specifying storage size or speed will dramatically degrade performance. Processing will take much longer or fail.
This configuration places the database on the same SQL Server instance as the data modeling warehouse. This saves purchasing a second SQL Server license but does introduce a small risk that model processing will affect report performance. For large-user-count implementations, which place a heavier load on the database, a second SQL Server instance should be considered.
SQL Server Cumulate Updates (CUs) contain a rollup of previous hotfixes (but no new features) and are released on a regular, frequent schedule.
Note
It is strongly recommended that all instances of SQL Server have the latest relevant CU applied.
Server performance recommendations
Processing performance
The following five hardware items and settings may improve model processing performance (both warehouse and cube). The items are presented in order of impact.
High-speed, solid-state drive for the computer hosting the data warehouse and cube.
Four or more high-frequency cores (2.6 GHz or better with access to 3 GHz or better turbo modes) for all computers.
Note
Four cores perform 1½-2 times faster than two cores, depending on the complexity of calculations in the model.
Adequate RAM (20 GB per 250 GB of source) and configuring the SQL Server Maximum Server Memory setting appropriately.
Windows power plan set to High performance.
In a virtualized environment, meeting the CPU core requirement for each server without over-allocation of the physical cores.
By following the above recommendations, to optimize the configuration, Data Hub can be expected to process a moderately complex ERP model with a 250 GB source in 1½-3 hours.
Important
Under-specifying the CPU will degrade performance at least linearly with respect to CPU speed and core count. This may lead to significant increases in processing time.
Under-specifying the memory or disk storage (size or speed) will dramatically degrade performance. Processing will take much longer or may fail.
Report performance
The following hardware items and settings may improve report loading performance. The items are presented in approximate order of impact.
High-frequency cores (2.6 GHz or better with access to 3 GHz or better turbo modes) for all computers.
Note
Report load times scale near-linearly with CPU core frequency.
For high user count implementations, providing adequate cores (two cores per 100 licensed consumer users).
Windows power plan set to High performance.
Background tasks (model processing and publication rules) scheduled to avoid periods when analytics are being designed or viewed, or providing a separate background task server to handle them. (Refer to the configuration described in Two-Tier for details on implementing a separate background task server.)
In a virtualized environment, meeting the CPU core requirement for each server without over-allocation of the physical cores.
Improved performance recommendations
If you use anti-virus software, make sure you exclude appropriate folders and files for Data Hub, the .NET framework, and SQL Server from virus scanning. This improves performance and makes sure the files are not locked by the virus scanner when they are needed.
For more detail, refer to the following article in the Data Hub Knowledge Base: https://zendesk.zaptechnology.com/hc/en-us/articles/215786268-AntiVirus-Exclusion-Recommendations-for-ZAP-BI-and-SQL.
Note
Knowledge Base articles can be located on the Data Hub Support website. Accessing the Knowledge Base and Community Forums requires that you log in to this website.
Virtualization considerations
Data Hub is fully supported in virtualized environments. Performance is subject to a small falloff, consistent with the virtualization software provider’s guidance (e.g. 10% for Microsoft Hyper-V).
Over-allocation and Relative Weighting
Over-allocation (also known as over-subscription) is a mechanism that allocates resources to virtual environments that require more than the physical resources available. Over-allocation is one of the most common causes of Data Hub underperformance.
It is not recommended to run Data Hub within a processor or RAM over-allocated environment. This includes not relying on virtual memory to fulfill memory requirements.
Hyper-threading
Hyper-threading does not provide a significant benefit for Data Hub processing over the number of physical cores allocated. It is recommended that the required number of physical cores be allocated to Data Hub.
High-availability
For high-availability requirements, the recommendation is to configuring an IIS web farm. Additionally, clustering techniques can be used to ensure the high availability of the SQL Server components.
Outbound internet connectivity requirements
Some Data Hub features need outbound internet connectivity to operate. If you are operating in an environment where outbound connectivity is controlled, you will need to make appropriate settings in your organization's firewall to ensure Data Hub has the required access. The following information lets you decide the appropriate firewall settings.
Data Hub outbound requests come from the following two server processes:
IIS (C:\Windows\System32\inetsrv\w3wp.exe)
C:\Program Files\Data Hub\bin\phantomjs.exe
The TCP protocol is used on ports 443 and 80.
The table below shows which URLs are accessed.
Feature | Description | URL |
License Retrieval and Solution Management | Highly Recommended. Without this access, Data Hub licenses cannot be retrieved using a license key. | https://webservices.zaptechnology.com (Data Hub version 7.0 and older) https://services.zapbi.com/ (Data Hub version 7.1 and newer) |
Map Provider (e.g. Mapbox) | Mandatory when using the Map chart types (see About Map Charts for details). The map visualization will not work otherwise. Connections may be made from the Data Hub server (or from any node if a web farm is used), or from client computers. | If using Mapbox (the default), the URL is *.mapbox.com. If using another map data provider, consult the data provider's documentation. |
Model Data Sources | Mandatory when connecting to online data sources, such as Toggl, Zendesk, and salesforce.com. Connections are only made from the Data Hub server computer (or from any node if a web farm is used). | See the data source connection details (Connecting to the Selected Data Source) and review the source application documentation for information. |
Install a web farm Master Node
It is recommended that Microsoft best practice is used for setting up a web farm, using Application Request Routing (ARR) supported by Network Load Balancing (NLB). Refer to: http://www.iis.net/learn/web-hosting/scenario-build-a-web-farm-with-iis-servers for details.
Procedure to create a Data Hub web farm
Install Data Hub on the server that will become the master node ‒ its settings will be replicated to the other nodes.
Install Data Hub on the other nodes in the web farm, specify the same metadata database.
Configure web farm settings in Data Hub.
Configure IIS settings.
Configure Domain Name System (DNS) and Service Principal Name (SPN) settings.
Refer to this knowledge base post: https://zendesk.zapbi.com/hc/en-us/articles/204777677-Deploying-ZapBI-in-IIS-Web-Farm-environment-with-Application-Request-Routing-server.
Download installation files
Note
Participants in the early adopter program may have access to different versions of the installation files.
Hotfixes are not available on the Data Hub Support Center website.
To download installation files from the Data Hub Support Center website.
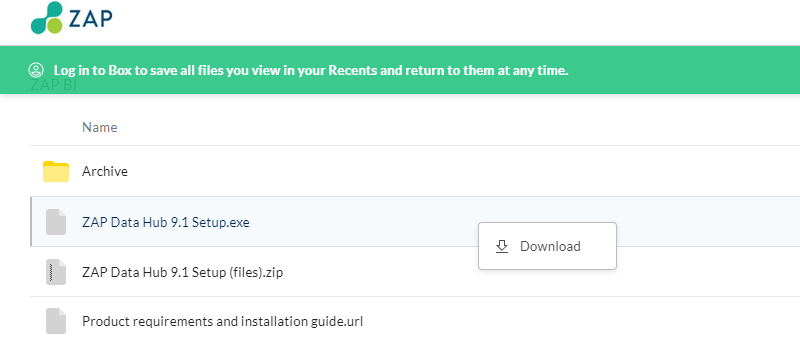
Using a web browser, navigate to the following URL: https://zap.app.box.com/v/ZAPBIProductDownload
https://zap.app.box.com/v/ZAPBIProductDownload
If prompted, log into the website.
On the entry named Data Hub <version> Setup.exe (such as Data Hub 9.2 Setup.exe), right-click and select Download.
Important
Ensure you understand the System Administrator role prior to proceeding. The first user of Data Hub after installation will be assigned as the System Administrator for this instance of Data Hub and this role cannot be changed later.
System administrators
Data Hub has the global role of System Administrator. This role gives unlimited access to all resources across all organizations, and to additional application and license settings. The System Administrator role cannot be edited or deleted, and no additional roles may be created in the Global policy.
Automatically configured system administrator users
The user who first runs Data Hub after it is installed is automatically assigned the system administrator role in the global policy.
Note
If you are a system administrator, you can create additional system administrators.
By default, the user who first runs Data Hub is also assigned the Administrator role for the Default Organization policy. This enables them to administer the Default Organization, even if they are later removed as a system administrator.
User role management
System administrators can check the quotas for each role type allowed by their license the number of users allocated to each role using the Licenses link on the Settings tab.
System administrators and organization administrators can also check the number of users allocated to each role type using the User Profiles link on the Settings tab.
If the Viewer Access setting is enabled by a system administrator (or administrator), any users who access a Data Hub resource via a Viewer URL (from SharePoint, for example) are automatically registered against the Viewer role type quota.
Install the Data Hub application
This procedure installs the Data Hub application files and grants access to the configuration options.
On the intended Data Hub host device:
Navigate to the downloaded installation file Data Hub <version> Setup.exe, and double-click the file to start the installation wizard.
Click INSTALL.
If a User Account Control dialog box appears, click Yes.
The Data Hub Website Administration Configuring Windows screen is shown while the required Windows components are installed and configured.
Once the Windows components are installed and configured, the Data Hub Website Administration screen will show the following options:
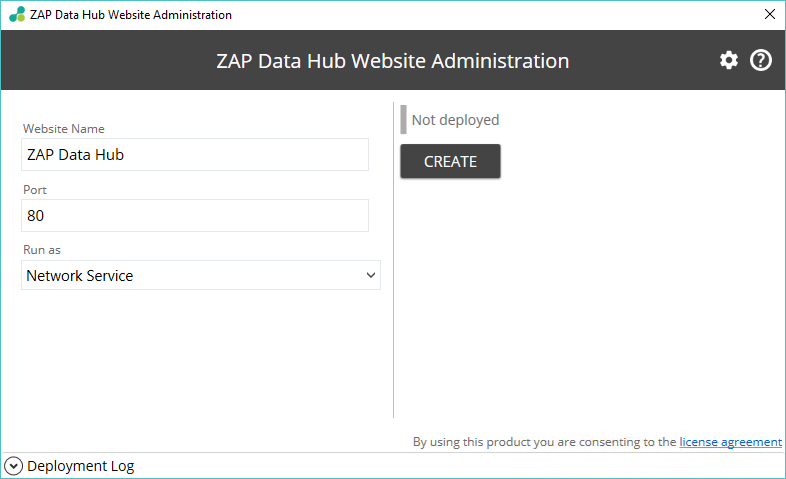
Website Name. The name of the Data Hub application (website) will appear in Microsoft Internet Information Services (IIS).
Port. The port number will be bound to HTTP on the specified website. The default value is 80 (or 8110 if port 80 is already reserved).
Run as. The identity (user account) to use for the Windows application pool. The following options are available:
Network Service. The Windows NetworkService Account is used. This option is recommended where practical.
Windows Account. If the NetworkService Account is not suitable, (for example: due to unsuitable permissions or company policy), you may specify a Windows user name and password to use for the application pool identity.
Review the Data Hub license by clicking the license agreement link in the lower right corner of the dialog box. The license agreement appears in your default web browser.
Click CREATE.
The Data Hub website is created and the configuration wizard's First Time Setup screen appears in your default browser.

Return to the Data Hub Website Administration dialog box. The URL for your installation is displayed, along with the current status of the application (Running) and the option to stop the application using Stop.
Note
Use this dialog box to stop the application (website), access log files, or view your system's Microsoft Internet Information Services (IIS) interface.
Use this dialog box to stop the application (website), access log files, or view your system's Microsoft Internet Information Services (IIS) interface.
Configure the master node
Return to the First Time Setup screen. If you have closed your browser since the installation, open a new browser and navigate to http://localhost:<PORT>/Admin/Initialization, where <PORT> is the port provided during installation.

Click CREATE NEW DATABASE.
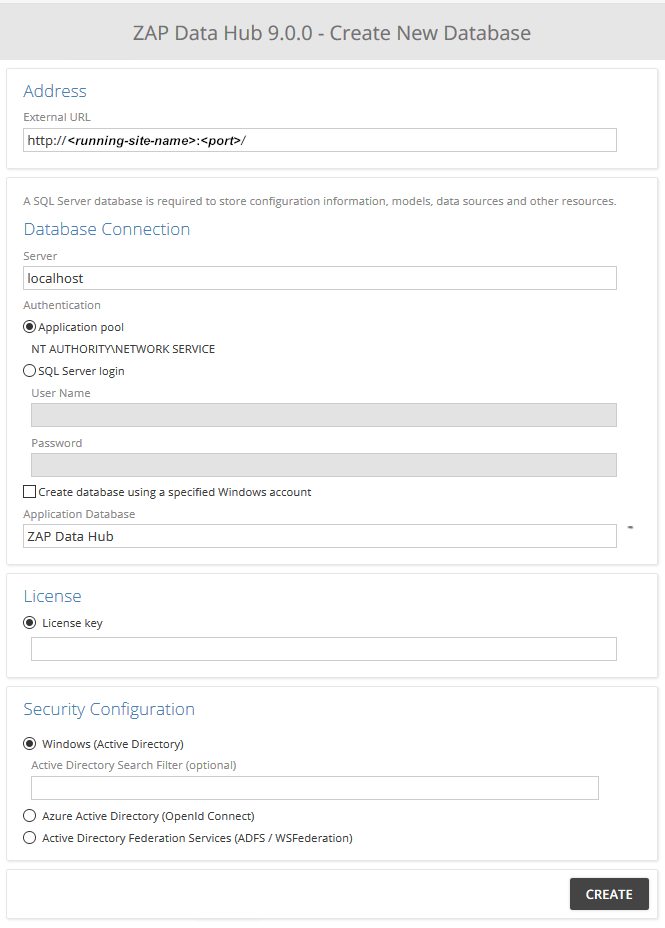
Specify the following settings which are necessary when creating the new Data Hub database:
External URL - Use this text box to specify the URL that will be used to access Data Hub from any client computer. The default value provided can be retained if desired.
Server - Use the server name if the Microsoft SQL Server instance is on the same network as the Data Hub server. Otherwise, a fully qualified domain name (FQDN) is required.
Authentication - Depending on how your Microsoft SQL Server is configured, authentication credentials are provided by either:
Windows Authentication - Select to use a Windows user name and password to connect to the Microsoft SQL Server. Active Domain credentials are also accepted.
SQL Server Authentication - Select to use a SQL Server user name and password to connect to the Microsoft SQL Server.
Create a database using a specified Windows account - To run Data Hub as a specified Windows user, check this option and provide the login details for the intended user account. By default, Data Hub operates under the Windows application pool (NT AUTHORITY\NETWORK SERVICE). If the application pool identity doesn't have permission to create SQL Server databases, the database creation step will fail.
Application Database - Specify the name of the new database. The name you enter is checked against any existing databases on the selected server. If the name is unique, a green checkmark appears to the right of the text box.
License - Enter the license key for the instance of Data Hub being installed. This key is provided by either:
Your Data Hub account manager or partner.
The Data Hub Support Center website.
Security Configuration - The section allows you to specify the type of user authentication used with this instance of Data Hub. For more information.
Environment Type
None - Select this option for Data Hub warehouse-only deployments and Tableau-enabled Model Servers.
SSAS Multi-Dimensional - Select this option to connect the Model Server to a Microsoft SQL Server Analysis Services (SSAS) instance.
Server
Enter the server name if the server hosting Microsoft SQL Server Analysis Services (SSAS) is on the same network as the Data Hub. Otherwise, a fully qualified domain name (FQDN) or a NetBIOS name is required.
Azure SQL Server - Enter the SQL server URL provided by Microsoft Azure.
Login Type
Application pool - Allows Data Hub to connect to the Warehouse using an application pool service account (if configured).
Specified - Allows Data Hub to connect to the Warehouse using a Windows user name (including domain) and password. (On-premises SQL Server only)
SQL Server login - Allows Data Hub to connect to the Warehouse using SQL Server user name (including domain) and password.
Click CREATE.
In the Organization Name text box, type the name of the new organization. Choose a descriptive name for your organization. The full address of the organization appears immediately below this setting.
In the Cube Connection area, specify the server name (Server text box) and one of the following authentication methods for SQL Server Analysis Services (SSAS).
In the Warehouse Connection area, specify the server name (Server text box) and one of the following authentication methods for the warehouse server.
Click TEST CONNECTION.
Important
The test connection must be successful before you can continue the configuration process.
Click CREATE.
The organization is created, the configuration process is completed, and Data Hub is opened in your default browser. The application is now ready to use.
Install a web farm secondary node
Download installation files
Note
Hotfixes are not available on the Support Center website. If you require a hotfix to correct a specific issue, log a ticket with the Support website.
You can download the installation files from the Support Center website.
Using a web browser, navigate to the following URL:
If prompted, log into the website.
On the entry named Data Hub <version> Setup.exe (such as Data Hub 9.2 Setup.exe), right-click and select Download.
 |
Install the Data Hub application
This procedure installs the Data Hub application files and grants access to the configuration options.
On the intended Data Hub host device:
Navigate to the downloaded installation file Data Hub <version> Setup.exe, and double-click the file to start the installation wizard.
Click INSTALL.
If a User Account Control dialog box appears, click Yes.
Once the Windows components are installed and configured, the Data Hub Website Administration screen will show the following options:
Website Name - The name of the Data Hub application (website) as it will appear in Microsoft Internet Information Services (IIS).
Port - The port number will be bound to HTTP on the specified website. The default value is 80 (or 8110 if port 80 is already reserved).
Run as - The identity (user account) to use for the Windows application pool. The following options are available:
Network Service - The Windows NetworkService Account is used. This option is recommended where practical.
Windows Account - If the NetworkService Account is not suitable, (for example: due to unsuitable permissions or company policy), you may specify a Windows user name and password to use for the application pool identity.
Review the Data Hub license by clicking the license agreement link in the lower right corner of the dialog box. The license agreement appears in your default web browser.
Click CREATE.
Return to the Data Hub Website Administration dialog box. The URL for your installation is displayed, along with the current status of the application (Running) and the option to stop the application by clicking Stop.
Note
Use this dialog box to stop the application (website), access log files, or view your system's Microsoft Internet Information Services (IIS) interface.
Close the Data Hub Website Administration dialog box.
Configure a web farm secondary node
This topic describes the standard (typical) process when an existing Data Hub database needs to be upgraded for use with the most recent release of Data Hub.
Return to the First Time Setup screen. If you have closed your browser since the installation, open a new browser and navigate to http://localhost:<PORT>/Admin/Initialization, where <PORT> is the port provided during installation.
Click CONNECT TO EXISTING DATABASE.
Connect to the SQL Server database created for the web farm master node by entering the following database settings:
Server - The name of the server hosting SQL Server to which the installation wizard will connect and on which the existing database is hosted. If the SQL Server instance is a named instance, follow the server name with a backslash and the instance name.
Authentication - Specify how you will connect to the server hosting SQL Server (specified in the previous setting). If you select the SQL Server login option, you'll need to specify a user name and password combination for connecting to the specified SQL Server host.
Application Database - Specify the name of the existing database. If the name is valid, a green checkmark appears to the right of the text box.
Click CONNECT. If the connection is successful, the Data Hub start page appears.
Configure web farm settings
If a web farm is implemented for the Data Hub web application server, it must be configured in Data Hub.
Web farm settings can be viewed and configured using the Settings tab.
Open the Settings tab.
Click the Web Farm link.
Enable or disable the web farm feature using the Enable / Disable web farm link. Clicking this link allows you to switch back and forth between the enabled or disabled settings.
Note
If only one server is connected to the Data Hub database, you should disable the web farm feature.
The Configuration section shows which nodes are included in the web farm, and lets you configure them. If a node is shown as (local), this indicates that your current session of Data Hub is connected to that node. You cannot remove a node marked as local.
In the Master column, specify a master server. The master server is the primary contact point for all other nodes and must be functioning for the web farm to operate. When a new node is connected to the web farm, it contacts the master server to get details of other nodes. The master server is also responsible for evaluating events that trigger publication rules (although it may not execute the publication rules themselves, as that is controlled by the Process background tasks setting.
In the Configuration area, use the Process background tasks column to specify which servers are used to perform background tasks. Background tasks consist of processing data models and publication rules. You can select individual servers or use the check box adjacent to the Process background tasks column heading to select all of the listed servers.
Note
If you want a node to only process background tasks, and not respond to any web requests, remove it from the network load balancer using the Windows NLB Manager tool.
(Optional) If a server has been decommissioned, you may delete it from the web farm screen using the remove link to the right of its listing in the Configuration area.
Review the information in the Status area, which shows you all servers in the web farm and lets you monitor communication between nodes. This is helpful for diagnosing web farm issues.
Basic security for a web farm deployment
Simple security configuration
By default, Data Hub is initially installed with access provided only for the user (typically a system administrator) who first opens it. The following procedure describes the minimum, simplest security configuration necessary to provide Data Hub access to other users.
In many cases, this procedure will be the only one necessary to fully configure your security if you:
Are using Windows authentication with Active Directory.
Require only the five standard roles (consumer, analyst, report designer, full designer, and administrator).
Need only a single organization (meaning that all users can share a permissions regime and workspace).
Security configuration steps
Create users and groups in the Active Directory Users and Computers console snap-in.
Note
You will often be able to use or modify existing users and groups instead of creating them.
If necessary:
Create the needed Administrator, Report Designer, Full Designer, Analyst, and Consumer users.
In Active Directory, these users are just ordinary users. You will allocate their permissions (roles) inside Data Hub.
Create one or more global groups that reflect the users' roles in the organization (for example G-Finance, G-Sales, G-Executives). It is recommended that you use a suitable naming convention for the groups.
Add the appropriate users to the appropriate global groups, based on their organizational roles.
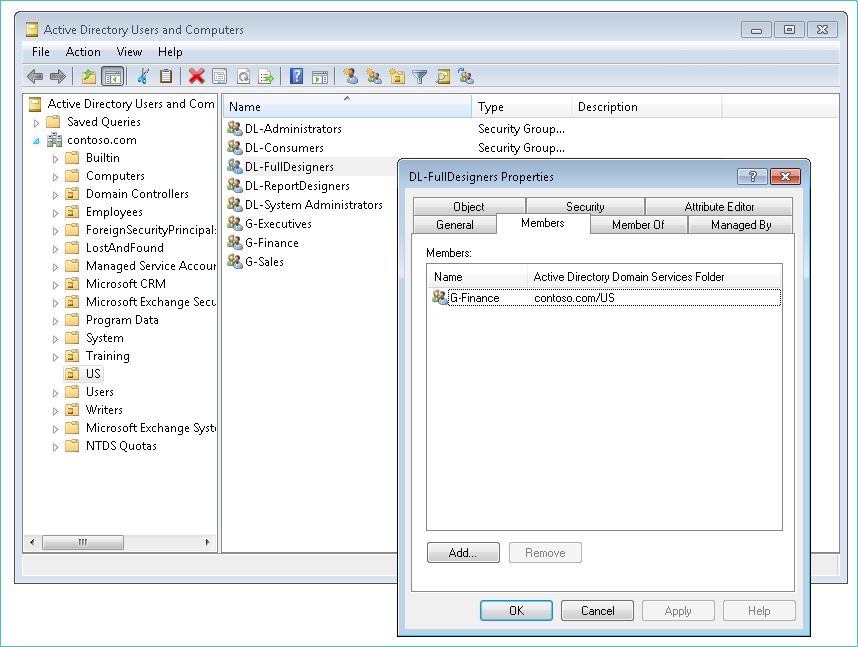
Create five domain local groups: DL-Administrators, DL-FullDesigners, DL-ReportDesigners, DL-Analysts, and DL-Consumers. If you are using multiple organizations, you may wish to create an additional group: DL-SystemAdministrators. Use a suitable naming convention for the groups.
Add the appropriate global groups as members of the appropriate domain local groups, based on their desired roles in Data Hub (DL-System Administrators, DL-Administrators, DL-FullDesigners, DL-ReportDesigners, DL-Analysts, and DL-Consumers). For example, make the G-Finance global group a member of the DL-FullDesigners domain local group to provide Finance department staff with Full Designer access to Data Hub.
Note
If you are using claims authentication, users and groups are configured in a similar way to the above procedure, although only global groups in the users' domain are needed. A user with the appropriate group membership must first (unsuccessfully) attempt to login in order for Data Hub to have access to the list of available groups.
Log into Data Hub as a system administrator user. If you have just installed Data Hub and were the first person to log in, you are automatically made a system administrator.
Click Settings > Users and Groups.
From the Users and Groups tab:
Verify that the correct organization is selected from the Organizations drop-down.
Use the Default Organization that is automatically created by Data Hub, or create additional custom organizations. In many cases, using the Default Organization will be sufficient.
Note
Multiple organizations are often created when each company in a corporate group requires a separate workspace and permissions regime, but the group shares a single instance of Data Hub. Another reason for creating a second organization is to have a development or training organization that is separate from the production organization.
Add the five Active Directory domain local groups (DL-Administrators, DL-FullDesigners, DL-ReportDesigners, DL-Analysts, and DL-Consumers) to the organization.
For each group, assign the correct role in the Selected Roles area. This step is where you define the users' access level (Administrator, Full Designer Consumer, etc.) by assigning the correct role to the group that contains the users.
Click Save.
Test the access by opening a new instance of Data Hub and attempting to log on as one of the users in the Active Directory global groups you used in the procedure above.
Note
To enter a different user's credentials into Data Hub, you may need to clear your cache, or use an Incognito window (Chrome), InPrivate browsing (Internet Explorer), or Private Browsing (Firefox), or use a different computer.
From this point on, the System Administrator simply has to manage the membership of the global groups using Active Directory Users and Computers to regulate access to Data Hub.
Configure application authentication settings
Select your application authentication method using the Authentication option available on the Settings tab, which opens the Authentication tab.
Note
The options on this tab also appear during the initial installation of a new instance of Data Hub as described in Installing Data Hub (On-premises Installations). They may also appear during a Data Hub upgrade as described in Non-Standard Data Hub Upgrade Steps.
Authentication tab options:
Windows (Active Directory) authentication. Allows you to authenticate users within an Active Directory domain.
Azure Active Directory (OpenId Connect) authentication. Allows claims-based authentication using Microsoft Azure AD.
Active Directory Federation Services (ADFS / WSFederation) authentication. Allows claims-based authentication using Microsoft ADFS.
Allow Anonymous Viewers check box. Allows unauthenticated users to view links that are shared with them.
Note
The Allow Anonymous Viewers feature may require a specific license permission to use. Without permission, the check box may not be visible.
Only resources in the Public folder (and its subfolders) may be shared with this feature.
To share a resource or folder with anonymous viewers, its viewer access setting must be enabled, by displaying the resource's security screen, and then clicking the Viewer Access button.
You may also need to override the inheritance of security permissions for the resource (using the Override button) before you can enable the Viewer Access button.
Windows (Active Directory) authentication
Selecting the Windows (Active Directory) option on the Configure Security Settings screen option requires no further configuration.
Data Hub uses the application pool identity of the webserver it is installed on to access Active Directory to authenticate users. Local system users and groups configured on the webserver computer, as well as Active Directory users and groups configured for the web server's domain may be used.
The best practice for Active Directory authentication is to use the AGDLP nested group model to minimize administration.
Note
Users from other domains may also authenticate if the appropriate trusts and group structures are set up.
The optional Active Directory Search Filter box lets you type an LDIF string to specify the distinguished name (DN) of the organization unit (OU) to use for Active Directory searches. For example, to specify the US\Washington OU for the contoso.com domain, type OU=Washington, OU=US, DC=contoso, DC=com.
Specifying a search filter may be useful if you have many users in your Active Directory, or your Active Directory is distributed across multiple sites connected by WAN links, in order to improve performance.
Any filter specified here will be applied when you search for users and groups to add to a Data Hub policy in the Users and Groups screen.
Azure Active Directory (AzureAD) authentication
Azure AD allows claims-based user and group management for Data Hub and other on-premises and cloud applications, such as Office 365 and Dynamics CRM Online. Once configured, users logging into Data Hub will be redirected to Azure AD to authenticate.
To use Data Hub with Azure AD, select Azure Active Directory (AzureAD) from the Configure Security Settings screen. Application registration for Data Hub must be completed in the Azure portal and the configuration values for Tenant, Client ID, Application Key obtained during the registration process must be pasted into the corresponding boxes in the Configure Security Settings screen.
Click Save.
For details on registering the Data Hub application and obtaining the Tenant, Client ID, and Application Key values, refer to the following Knowledge Base article: https://zendesk.zaptechnology.com/hc/en-us/articles/207150197.
Note
Accessing Knowledge Base articles may require that you log in to the Data Hub Support website.
Active Directory Federation Services (ADFS) authentication
ADFS implements claims-based federated identity for Windows for your Data Hub installation. ADFS enables single sign-on to authenticate users across security and enterprise boundaries.
To use Data Hub with ADFS, a relying party trust must be configured in the ADFS Management console, and the Federation Metadata URL and Realm URI (the Data Hub application's web address) entered into the appropriate boxes in the Configure Security Settings screen.
Click Save to finish.
For details on configuring a relying party trust and obtaining the Federation Metadata URL and Realm https://zendesk.zaptechnology.com/hc/en-us/articles/207150197URI values, values, refer to the following Knowledge Base article: https://zendesk.zaptechnology.com/hc/en-us/articles/207150197.
Note
Accessing Knowledge Base articles may require that you log in to the Data Hub Support website.
Add an organization
You can add an organization to a Data Hub installation.
Note
Only System Administrators may add and remove organizations and are permitted to see the Organizations link on the Settings tab.
Click the Settings button on the Utility Toolbar.
The Settings tab appears.
In the Organizations group, click the Organizations link.
The Organizations tab appears.
Click the Create New Organization button.
The Add New Organization screen appears in a separate browser tab.
In the Organization Name text box, type the name of the new organization.
The Address entry below the text box updates, showing the URL of the new organization, including the name you specify.
In the Cube Connection area, specify the server name (Server text box) and one of the following authentication methods for SQL Server Analysis Services (SSAS):
Environment Type
None. Select this option for Data Hub warehouse-only deployments and Tableau-enabled Model Servers.
SSAS Multi-Dimensional. Select this option to connect the Model Server to a Microsoft SQL Server Analysis Services (SSAS) instance.
Server
Enter the server name if the server hosting Microsoft SQL Server Analysis Services (SSAS) is on the same network as the Data Hub. Otherwise, a fully qualified domain name (FQDN) or a NetBIOS name is required.
If the SSAS instance is a named instance, follow the machine name with a backslash and the instance name.
Login Type
Specify one of the following authentication methods:
Application pool. Allows Data Hub to connect to the SSAS using an application pool service account (if configured). For information on application pools, see: About Authentication in a Model Server or Adjust Executing User for Application Pool.
Specified. Enter an authorized user name (including domain) and corresponding password for connecting to the SSAS.
Environment Type
From the drop-down list, select one of the following:
On-premises SQL Server. Select this option to connect to a Microsoft SQL Server.
Azure SQL Server. Select this option to connect to an Azure SQL Server.
Server
On-premises SQL Server - Enter the server name if the server hosting the Microsoft SQL Server Database Engine instance is on the same network as the Data Hub. Otherwise, a fully qualified domain name (FQDN) is required.
Azure SQL Server - Enter the SQL server URL provided by Microsoft Azure.
Login Type
Specify one of the following authentication settings:
Application pool. Allows Data Hub to connect to the Warehouse using an application pool service account (if configured).
Specified. Allows Data Hub to connect to the Warehouse using a Windows user name (including domain) and password. (On-premises SQL Server only)
SQL Server login. Allows Data Hub to connect to the Warehouse using SQL Server user name (including domain) and password.
In the Warehouse Connection area, specify the server name (Server text box) and one of the following authentication methods for the warehouse server:
Click TEST CONNECTION.
Click CREATE.
Close the Organizations tab. Your changes are automatically saved.
Basic configuration for a Data Hub Web Farm deployment
Back up the Data Hub SQL server database
To ensure optimal operation and redundancy in the event of system failure, the Data Hub SQL Server database must be backed up regularly as shown below:
Create a full database backup in SQL Server Management Studio.
Regularly conduct a Data Hub export of all resources.
Configure appearance settings
Use the Appearance tab to customize the Data Hub application's appearance by:
Changing the name of the application at the organization level.
Uploading images for certain logos in the application, such as jewels and icons.
Selecting application colors, including two types of highlighting colors.
Note
You need a specific feature license permission to access these appearance options.
The Appearance tab is accessed via the Appearance link on the Settings tab.