Configure a Data Hub instance for multiple organizations
Create an organization
Add an organization
Add an organization to a Data Hub installation using the Organizations tab.
Note
Only System Administrators can add or remove organizations and view Organizations on the Settings tab.
Click Settings on the Utility Toolbar to reveal the Settings tab.
Click Organizations in the Organizations group, to reveal the Organizations tab.
Click Create New Organization.
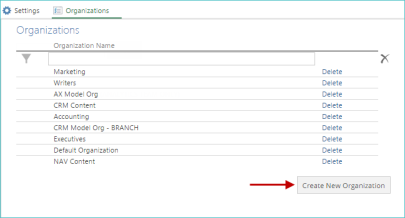
The Add New Organization screen appears in a separate browser tab.
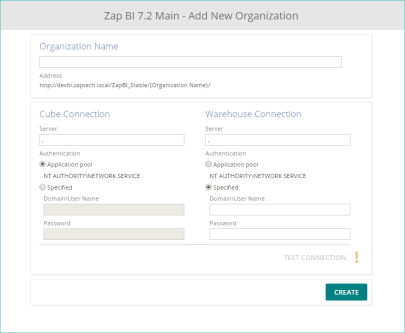
In the Organization Name text box, type the name of the new organization.
In the Cube Connection area, specify the server name (server text box) and one of the following authentication methods for SQL Server Analysis Services (SSAS):
Environment Type
None - Select this option for Data Hub warehouse-only deployments and Tableau-enabled Model Servers.
SSAS Multi-Dimensional - Select this option to connect the Model Server to a Microsoft SQL Server Analysis Services (SSAS) instance.
Server
Enter the server name if the server hosting Microsoft SQL Server Analysis Services (SSAS) is on the same network as the Data Hub. Otherwise, a fully qualified domain name (FQDN) or a NetBIOS name is required.
If the SSAS instance is a named instance, follow the machine name with a backslash and the instance name.
Login Type
Application pool - Allows Data Hub to connect to the SSAS using an application pool service account (if configured).
Specified - Enter an authorized user name (including domain) and corresponding password for connecting to the SSAS.
In the Warehouse Connection area, specify the server name (Server text box) and one of the following authentication methods for the warehouse server:
Environment Type
On-premises SQL Server - Select this option to connect to a Microsoft SQL Server
Azure SQL Server - Select this option to connect to an Azure SQL Server.
Server
Azure SQL Server - Enter the SQL server URL provided by Microsoft Azure.
On-premises SQL Server - Enter the server name if the server hosting the Microsoft SQL Server Database Engine instance is on the same network as the Data Hub; otherwise, a fully-qualified domain name (FQDN) is required.
Login Type
Application pool - Allows Data Hub to connect to the Warehouse using an application pool service account (if configured).
Specified - Allows Data Hub to connect to the Warehouse using a Windows user name (including domain) and password (on-premises SQL Server only).
SQL Server login - Allows Data Hub to connect to the Warehouse using SQL Server user name (including domain) and password.
Click TEST CONNECTION. If the connection to the cube and warehouse is successful, a green checkmark appears to the right of the button. This process may take a few moments. If any errors occur, review the displayed information, correct the error, and click TEST CONNECTION again
Click CREATE.
Close the Organizations tab. Your changes are automatically saved.
Manage an organization
View existing organizations
View all currently existing organizations in Data Hub using the Organizations tab and filter the display list of organizations to make it easier to find a specific organization.
Note
Only System Administrators may view, add, or delete organizations and view them on the Settings tab.
Click Settings on the Utility Toolbar to reveal the Settings tab.
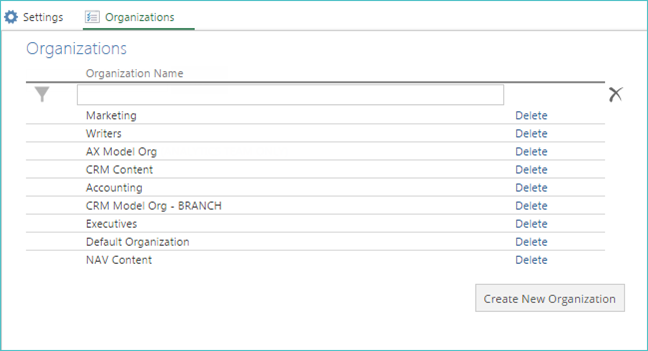
In the Organizations group, click the Organizations link. The Organizations tab displays all currently defined organizations.
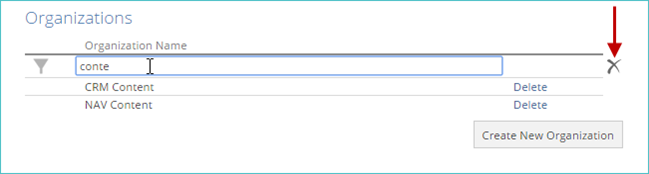
(Optional) Filter the list of organizations.
Begin typing text in the filter text box at the top of the list of organizations. As you type, the list is updated so that only organizations matching the text are displayed.
Click Clearfilter to remove the filter text and return to the full list of organizations.
Delete an organization
Remove an organization from your environment if it is no longer needed.
Note
Only System Administrators may add and remove organizations.
Important
Deleting an organization permanently removes all users and resources associated with it. The deletion cannot be undone. For safety, create a backup of the Data Hub database before proceeding with the deletion of an organization.
Click Settings on the Utility toolbar to reveal the Settings tab.
Click Organizations In the Organizations group, to reveal the Organizations tab.
Click the Delete link that corresponds to the organization you want to remove.

Click Yes to remove the organization from your environment.
Close Organizations tab. Your changes are automatically saved.
Assign a user to an organization
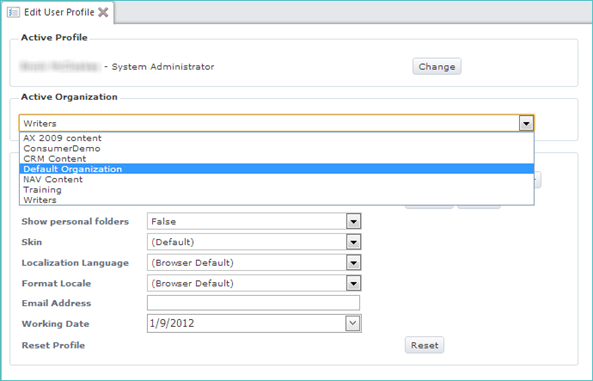
For on-premises installations, you can change the organization whose workspace the selected user profile will be able to access and edit using the Active Organization drop-down.
Note
This drop-down list is only visible if there is more than one organization in the current Data Hub environment, and if the current user has access to more than one of these organizations. System Administrators always have access to all organizations.
Access your user profile.
Change to the user profile you want to edit.
Select the desired organization from the Active Organization drop-down.
Click Save. You will be returned to the Settings tab.