Scripts
Overview
Database scripts allow you to execute commands (via T-SQL) at specific times during warehouse processing. The scripts are specified using the Database Scripts list on the model tab.
You can create any number of custom database scripts, and, like with other data model resources, the configuration of each script takes place on a separate tab.
Script types
Once a model has been configured, it needs to be processed, which creates the corresponding data warehouse and cube. You can process the entire model or specific model pipelines.
You can also process an individual database script as described below (Process Database Scripts).
View database scripts
View all defined database scripts using the Database Scripts list on the model screen.
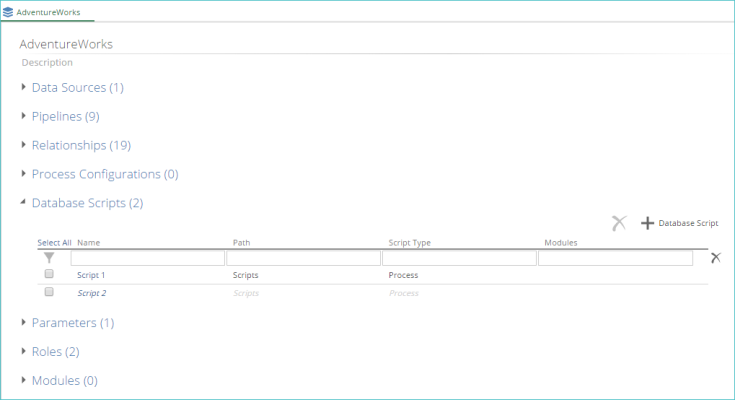 |
The following information is shown for each listed script:
Script name.
Script description.
Time when the script will be executed (Run At column). This entry is controlled by the script's Script Type setting.
Tags assigned to the script (Modules column).
If a script has been created but not enabled, the name of the script is shown in italics (as highlighted below).
 |
If you have a large list of database scripts, you can filter the list using the filter options that appear at the top of the column.
 |
Clear any applied filter and view the full scripts list, using the clear filter button.
Create a new script by using the + Database Script button (above the full scripts list).
 |
Settings
After adding a script to the model, you should define it and all of its settings and then activate it by using the Enabled check box.
Select from the Script Type drop-down list, one of the following options:
Initialize - The script will be executed during warehouse publishing, before data migration. These types of scripts are run immediately before views and tables are created for pipelines. For example, a script might be used to create a stored procedure or function which is to be later used in a SQL step or calculation in a pipeline.
Process - The script will be executed during warehouse processing (after data migration), but before the cube is processed. These typed of scripts are run at the same time as pipelines are processed (e.g. a script used to populate a warehouse table from a specific external source table).
The precise run order of pipelines and scripts is determined by the Uses Pipelines and Uses Database Scripts settings in each script, and the Uses Database Scripts property in each pipeline.
Note
The run order of scripts can be viewed during processing in the Status area of a model's Properties panel.
Verify that you are defining a Process type script.
Important
If pipelines are added to a Process script, and the type is changed to Initialize, the specified pipelines are still listed, but the dependency is ignored. The same occurs if pipelines are drag-dropped into the text box. You will not see a list of selectable pipelines for Initialize scripts.
Begin typing the name of the pipeline you want to add, or click + in the right part of the corresponding text box. A list of matching, selectable pipelines appears.
Select the pipeline from the list to add it to the text box.
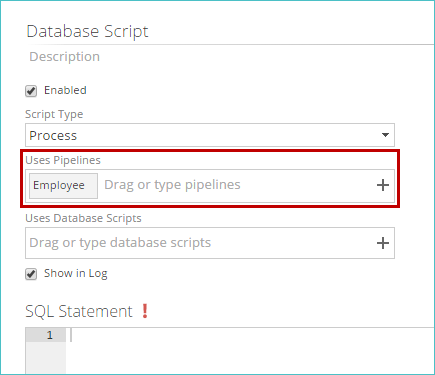
If the database script modifies the warehouse table for a particular pipeline, right-click a pipeline in the text box and select Script Modifies Pipeline. An icon is added to the pipeline.

The specified pipeline will show the current database script in the Used By entry of the pipeline's Properties panel (in the Processing Dependencies area). You can clear this setting by right-clicking the pipeline again and selecting Clear Script Modifies Pipeline.
Note
Pipelines marked as being modified by the current database script must create a warehouse table. This behavior is controlled using the Create Warehouse Table setting on the pipeline’s Properties panel (in the Database area).
Repeat this process until all desired pipelines are added.
Note
The current database script cannot depend on a database script of a different type (as determined using the Script Type setting).
Begin typing the name of the script you want to add, or click +in the right part of the corresponding text box. A list of matching scripts appears.
Select the script from the list. The script is added to the text box.
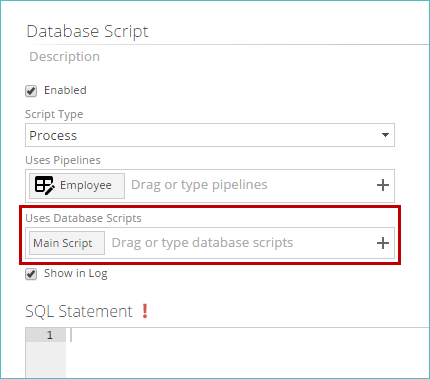
Repeat this process until all desired scripts are added.
Process scripts. Specify pipelines used by this script via the Uses Pipelines setting.
Specify other database scripts used by the script via the Uses Database Scripts setting. These scripts are those that must be executed before the current script is executed during model processing.
If you want to have the script's SQL appear in the Data Hub application log file, click Show in Log check box.
The application log file that is generated when you process a model always includes the name of each script that runs as well as its output, regardless of the state of this check box. If your script is large, you should leave Show in Log box as cleared (unchecked) to avoid making the log file too verbose.
Verify that you are defining a Process type script.
Important
If pipelines are added to a Process script, and the type is changed to Initialize, the specified pipelines are still listed, but the dependency is ignored. The same occurs if pipelines are drag-dropped into the text box. You will not see a list of selectable pipelines for Initialize scripts.
Begin typing the name of the pipeline you want to add, or click + in the right part of the corresponding text box. A list of matching, selectable pipelines appears.
Select the pipeline from the list to add it to the text box.
 |
If the database script modifies the warehouse table for a particular pipeline, right-click a pipeline in the text box and select Script Modifies Pipeline. An icon is added to the pipeline.
 |
The specified pipeline will show the current database script in the Used By entry of the pipeline's Properties panel (in the Processing Dependencies area). You can clear this setting by right-clicking the pipeline again and selecting Clear Script Modifies Pipeline.
Note
Pipelines marked as being modified by the current database script must create a warehouse table. This behavior is controlled using the Create Warehouse Table setting on the pipeline’s Properties panel (in the Database area).
Repeat this process until all desired pipelines are added.
Note
The current database script cannot depend on a database script of a different type (as determined using the Script Type setting).
Begin typing the name of the script you want to add, or click +in the right part of the corresponding text box. A list of matching scripts appears.
Select the script from the list. The script is added to the text box.
 |
Repeat this process until all desired scripts are added.
Process scripts and script dependencies
Database scripts
You can process an individual database script using the Process Database Script button on the script's Properties panel.
 |
This option only processes the affected pipelines, measure groups and dimensions. The corresponding model and cube are not processed.
If you have added a database script to the Process screen (or to the Properties panel), but you decide that you don't want to process it, you can remove it using the small "x" that appears when you hover over the script's entry in the corresponding text box.
Add modules
You can add modules (tags) to a database script via the resource properties (as with other resources).
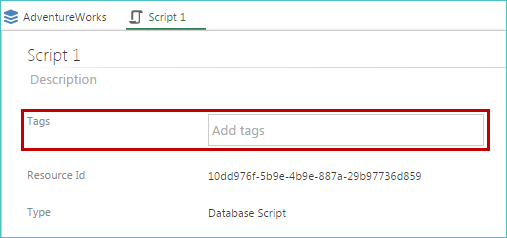 |
Once you assign a tag to a script, the tag's name is listed in the Modules column of the Database Scripts list (on the model screen). In the following example, the Finance tag has been added to the first script.
 |
Specify dependent scripts
When a database script is specified in a pipeline, the pipeline cannot be processed until the script has run. This dependency is specified using the Uses Database Scripts pipeline property (in the Processing Dependencies area).
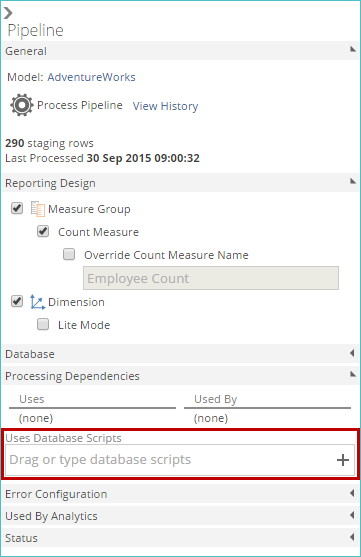 |
The exact moment of script execution in the overall process depends on the individual script's Type setting.
Process specific database scripts
You can process individual database scripts or groups of scripts, instead of processing all database scripts when an entire model is processed.
With database scripts, only affected measure groups and dimensions are processed, as opposed to the entire cube. This behavior increases the overall speed of script processing.
Individual database scripts can be processed directly from the script's tab or directly on the Process screen.
Important
Database scripts that match the following criteria cannot be specified using the above methods.
The script has not been enabled.
The script is of type Initialize, as these types of scripts always run when the model is processed. Specify individual Process type scripts, as desired.
Appendix
SQL syntax requirements for scripts
SQL Step
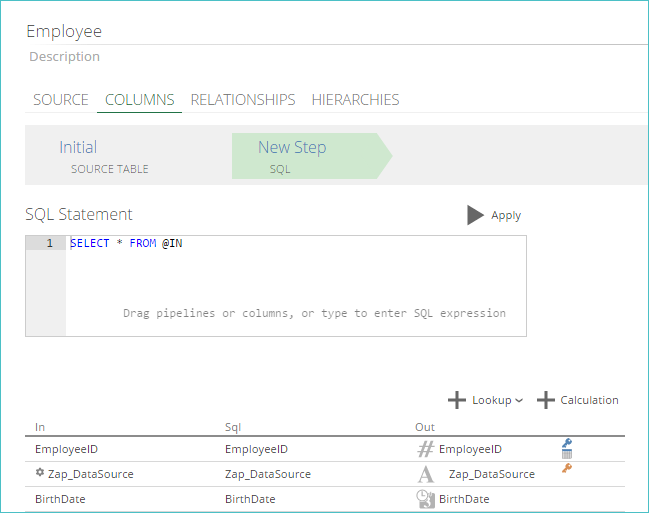
The SQL step allows you to specify a SQL SELECT statement that can be entered to manipulate data.
If necessary, add a SQL step as described in Adding Steps to a Pipeline. The step appears as shown below.
Note
The In column displays all the columns that are available for use in the SQL query written within the step.
Adjust the existing SQL in the SQL Statement text box, as necessary, using any of the following methods:
Type changes directly in the SQL Statement text box.
Drag-and-drop pipelines from the Resource Explorer to the SQL Statement text box.
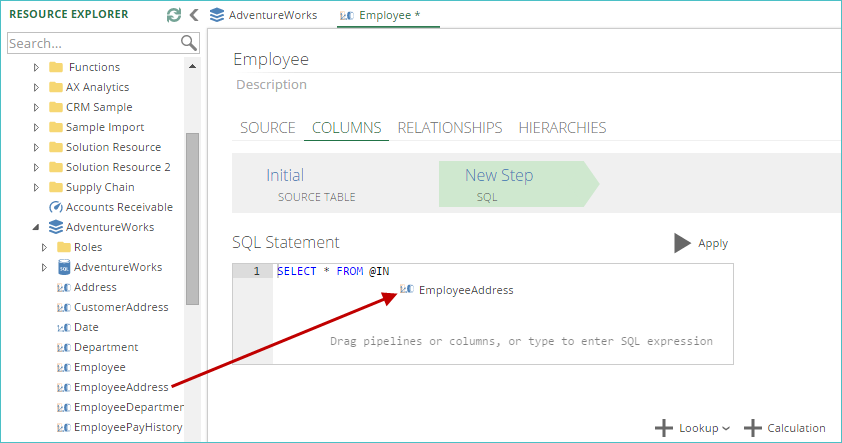
Alternatively, the pipeline names may be typed in, surrounded with $ characters. For example, the Sales pipeline would be entered as $Sales$.
Use the code completion options to view lists of available code and syntax options as you type an entry.
Drag-and-drop columns from the In column of the COLUMNS pipeline tab's column list into the SQLStatement text box, as shown below.
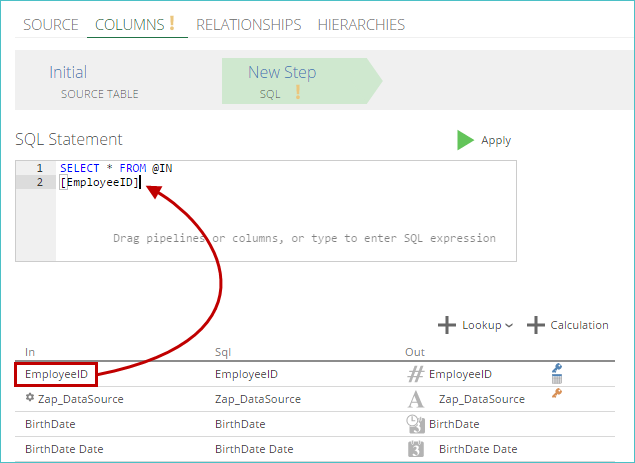
Note
The SQL syntax is validated, as you type it, when creating or editing the step. If a validation error is found, information about the error, including its location, appears below the large SQL text box.
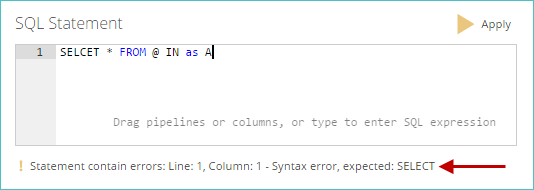
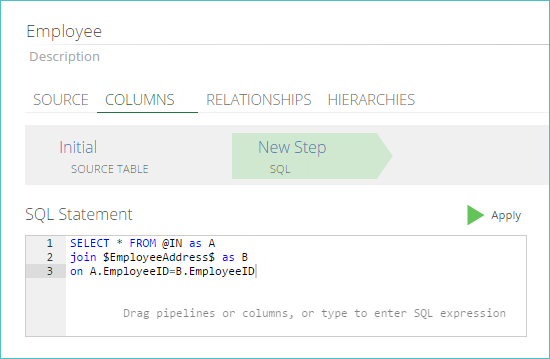
Click Apply to execute the SQL statement. The color of the triangle icon on the Apply button represents the status of the SQL expression:
Green. The expression has been successfully validated and may be executed.
Yellow. The expression is invalid or an error was encountered when executing the SQL expression.
Dark gray. The expression is currently being validated.
Light gray. The expression has already been executed. An example of a completed SQL step, which is implementing a join, is shown below.
Note
The SQL in a SQL step is executed against the data warehouse in the context of the user specified in the model server. Although the SQL is validated by Data Hub, this validation is not exhaustive. ZAP recommends you adopt good development practices and perform tests on models containing SQL steps in a development environment before deploying to the production environment.
(Optional) Go to the Preview area at the bottom of the pipeline tab, to locate the designated output column values. In the following example, only EmployeeID and Gender columns are used in the SQL statement.

Define a new calculated column using an SQL Expression
You can enter a scalar (single value) SQL expression to define a new column using + Calculation.
Tip
Example
To calculate a column called "Discount Amount", use the following SQL expression: [Sales Amount] * [Discount Pct]
Note
Lookups are always done before calculations in each step. You can define a lookup and a calculation in the same step, which allows you to define a calculation on a lookup column. If you wish to perform a lookup on a calculated column, you must configure the calculation in one step, and then add a lookup on the calculated column in a subsequent step.
After clicking +Calculation, a New Calculated Column, is added to the end of the pipeline schema.
On the right side of the screen, change the column's settings in the Properties panel.
In the Properties panel, enter a meaningful name for the calculated column.
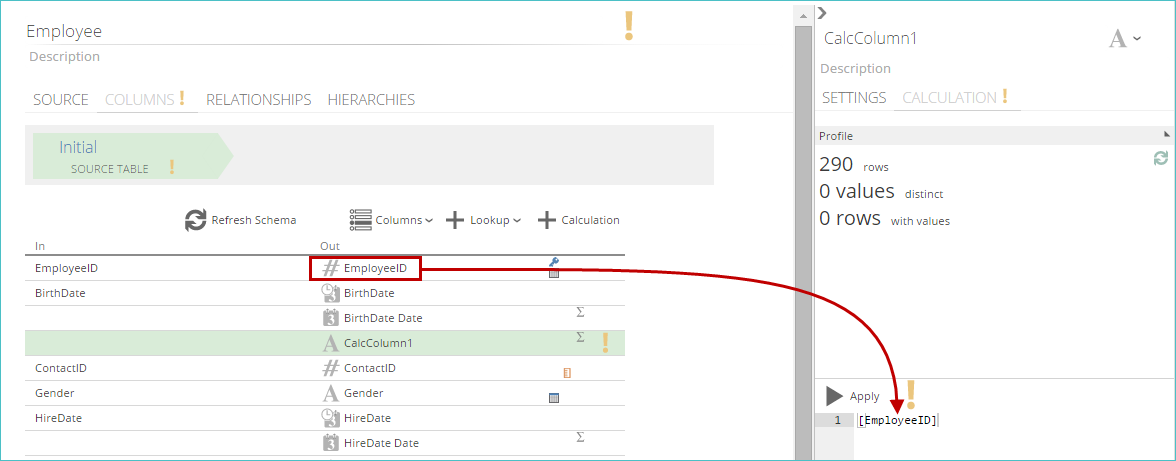
Enter a valid SQL expression for the column’s calculation. As you type, simple SQL syntax and column reference checking is dynamically performed. This feature saves time as typing errors are found quickly. The validation also verifies that columns in the current pipeline referred to in the SQL expression are correct, and that the SQL has correct syntax.
Note
If you change a column's physical name, any calculated columns in the current pipeline that refer to the column are automatically updated. Calculations in other pipelines that refer to the column will display an error indication. Clicking in the SQL panel for each offending calculation will force the column name to be updated.
Use defined parameters in the expression as described in Using Parameters in a Pipeline.
Use the code completion options to view lists of available code and syntax options as you type an entry.
Drag-and-drop columns from the Out column on the COLUMNS pipeline tab's column list.
Note
If you need to enter a conditional expression, use the SQL CASE expression. Refer to: https://msdn.microsoft.com/en-us/library/ms181765.aspx for details.
Click Apply to test run the SQL code. This action locates any run-time errors, such as divide by zero, that are not found by the dynamic syntax checking (which was performed as you typed the code). The associated column is automatically profiled and the information is immediately displayed in the Profile area on the Properties panel. The color of the triangle icon on the Apply button represents the status of the SQL expression:
Green. The expression has been successfully validated and may be executed.
Yellow. The expression is invalid or an error was encountered when executing the SQL expression.
Dark gray. The expression is currently being validated.
Light gray. The expression has already been executed.
Note
For examples of these colors, hover over the Apply button in the Data Hub interface and view the corresponding infotip.
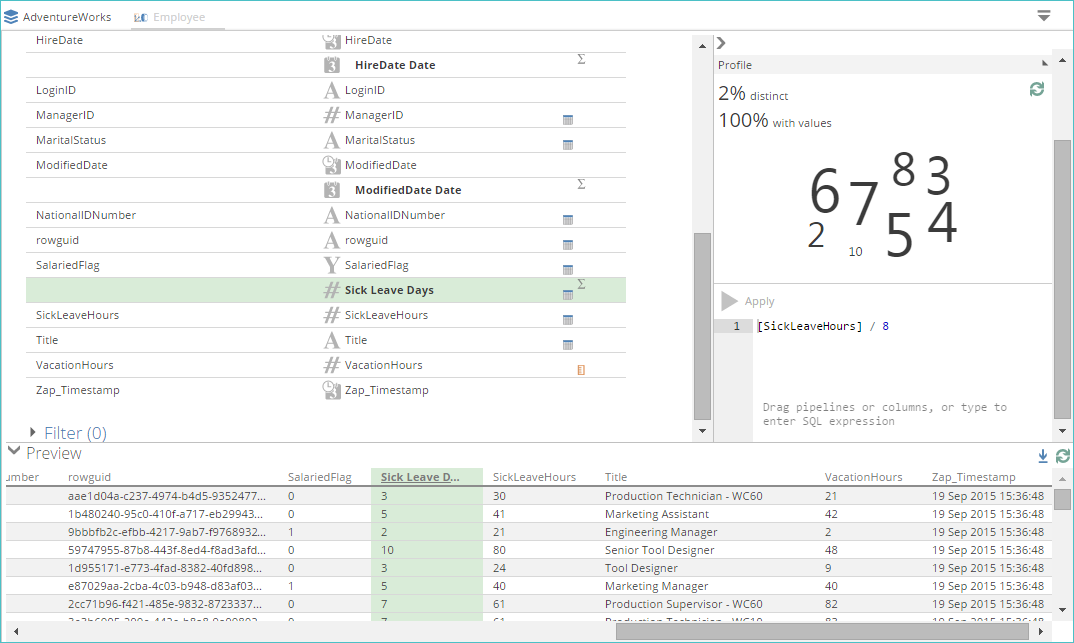
The calculation’s result appears in the Preview panel, at the bottom of the tab. The example below illustrates the calculation of sick leave days from sick leave hours in the employee pipeline (assuming an eight-hour work day).
Define a calculated column with a subquery
You can define a calculated column by entering SQL to perform a correlated subquery. A correlated subquery is a nested query which uses values from the outer query. The correlated subquery is evaluated once for each row returned by the outer query.
In the context of calculated columns in a data model, the "outer" query is performed transparently within Data Hub, and the subquery is executed within it, as part of the SELECT clause. You need only enter the subquery text in the calculated column.
The @IN and @INALIAS tokens are provided to support this functionality. The @IN token may be used to refer to the input table view to the current step within the pipeline. The @INALIAS token may be used to refer to the table in the otherwise-unseen "outer" section of the query.
In the following example, a complete SQL query to return information, including the amount (for each detail line on an invoice) together with the average value of the detail lines for that invoice, would appear as follows:
Tip
Example
select SalesOrderId, SalesOrderDetailId, LineTotal,
(select avg(LineTotal)
from Sales.SalesOrderDetail as [INNER]
where [INNER].SalesOrderID = [OUTER].SalesOrderID)
As AvgLineForSalesOrder
from Sales.SalesOrderDetail as [OUTER]
In a data model, the "outer" query would be implicit. To enter the subquery as a calculated column, use the @IN and @INALIAS tokens to replace the table names, as shown below:
Tip
Example
(select avg(LineTotal)
from @IN as [INNER]
where [INNER].SalesOrderID = @INALIAS.SalesOrderID)
SQL "GO" batch separator
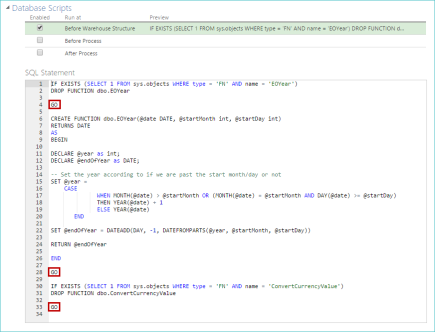
You can use the GO command to separate batches of SQL commands in database scripts. The GO command executes all the SQL statements in the current batch. A batch is defined as all the SQL commands since the previous GO command, or since the start of the script if this is the first GO command in the script.
The GO command is particularly useful for defining multiple functions for later use in the model and for ensuring that later parts of a script will run even if an earlier part fails.
Database scripts are defined on the Database Scripts list on the model screen. The example shows three separate batches, each terminated with GO.
 |
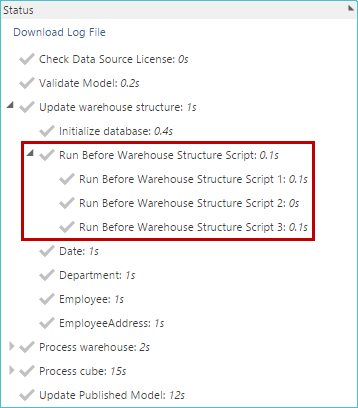
When GO is used, a separate entry for each executed batch of SQL commands appears in the Status area of the Properties panel when the model is processed. The example below shows the process status panel for the model containing the SQL shown above.
 |