Sage 100
Sage 100 is offered in 3 editions:
Standard and Advanced use the ProvideX file system to store the information. A 64bit ODBC driver is provided with Sage 100 to connect to ProvideX.
Enterprise uses SQL Server.
Connecting to the data source
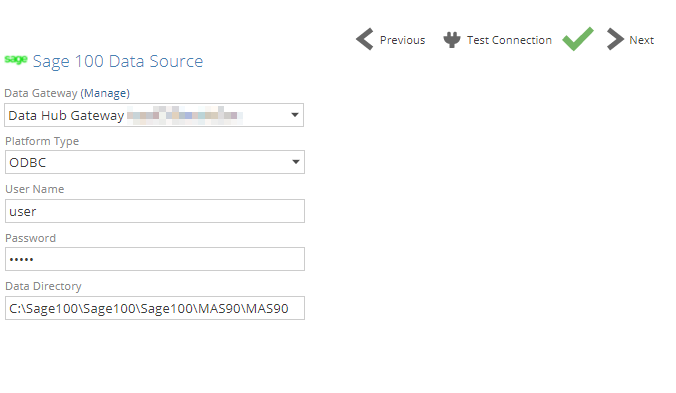
Platform Type: ODBC
 |
Important
Prerequisites before using ODBC in Data Hub:
The Sage ODBC driver has to be installed on the Sage100 Server. During installation, the Data Directory (required on the Data Hub connection) will be setup.
Create and install a data gateway on the same server where the Sage 100 Data Directory is.
Data Gateway: Select the data gateway installed on the Sage 100 Server or where the ODBC connection as been created.
Platform Type: choose ODBC
User Name - Specify the user name to login. This can be the same user used to login to Sage100.
Note
Permissions: The user needed to login from Data Hub, needs to be created in Sage100 first with relevant permissions, before connecting to ODBC. The user that deploys the Sage solution or create a model needs to have permission to all companies in Sage 100.
Password: Specify the relevant password
Data Directory: The data directory where the ProvideX file system is stored. This directory is configured during the ODBC connection setup.
Platform Type: SQL Server
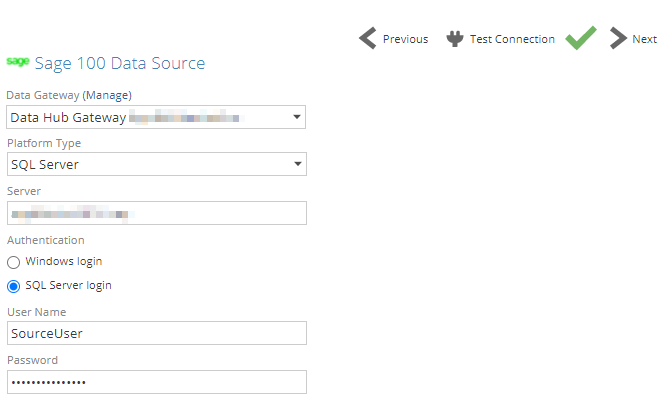 |
Data Gateway: Select the data gateway installed on the Sage 100 Server, or a network location with access to the Sage 100 server.
Platform Type: choose SQL Server
Server - The name of the SQL Server instance hosting the Sage 100 database you want to access. If the server hosts multiple instances, use the syntax ServerName\InstanceName.
Authentication - You can provide credentials to authenticate to the SQL Server instance hosting the Sage 100 database (specified above) in two ways. The method used will depend on how your SQL Server instance is configured:
Windows login - Enter a Windows user name and password.
SQL Server login - Enter a SQL Server user name and password.
Note
Permissions: The SQL user needs read access (+ view database state) to the MAS_system database and the individual company databases. It also needs permission to all companies in Sage 100.
User Name - Type a user name in the same form you use to log in directly to Windows or SQL Server (depending on which authentication method you chose above). This may be just a user name, or it may include the domain name in canonical form (domain\user) or UPN form (user@fully-qualified_domain_name), depending on your environment.
Password: Specify the relevant password
Database - Type the Sage database name to use as the data source, or select the Sage 100 database from a drop-down list of databases found on the specified SQL Server instance.
Advanced settings
Advanced connection settings is available to configure how source data will be extracted and processed. When source tables have large amounts of data in rows and/or size, using the 64bit ODBC driver can cause slow performance and crashing of the driver can sometimes occur.
A table size threshold and pagination settings can be configured to optimize source data processing as much as possible.
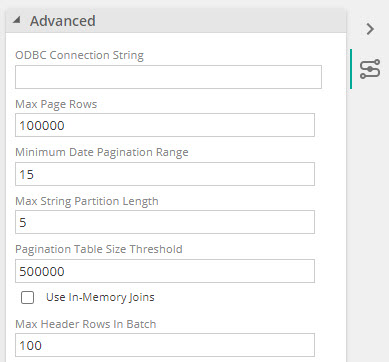
For a new data source connector, advanced settings can be found on the Advanced panel on the Connect screen.
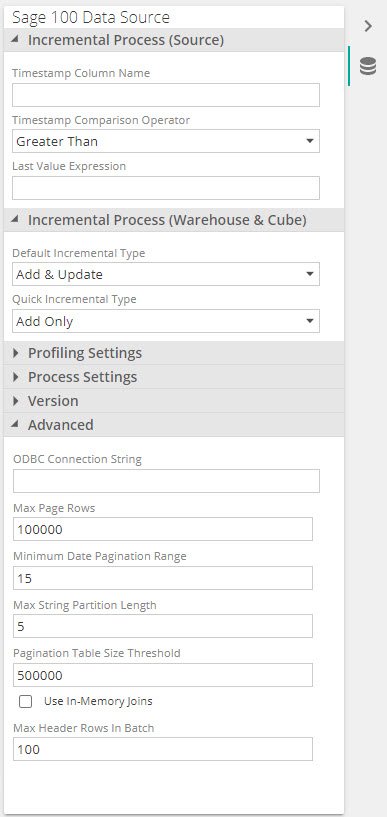
For an existing data source, view advanced properties on the Properties panel, under the Advanced section.
Configure advanced settings
Set the threshold at which a pagination strategy will be implemented.
Pagination Table Size Threshold: The number of rows to try and load a full table before using pagination. The default is 500 000.
Configure Pagination settings
Max Page Rows: The maximum number of rows to read before changing a table read's pagination strategy. For example if a date pagination range of 30 days returns more rows than the threshold set on this setting, Data Hub will move onto the next reduced page size as explained below in loading behavior strategy
Minimum Date Pagination range (Days): The number of days between a start and end date range. The default value is 60. For example, when 60 is specified, pagination will extract data in batches of 60 days.
Max String Partition Length: The max number of suffix characters to partition string pagination columns on.
Configure in-memory settings - only recommended when none of the above strategies is sufficient or when support recommends using these.
In-memory joins: In-memory joins will be used instead of ODBC join queries, thus queries joining multiple tables will be split into several queries against the individual tables and the results will be joined in-memory by the data source.
Max Header Rows In Batch: Maximum number of header rows to use when in-memory joins fetch the next line page.
Source data loading behavior strategy
This logic applies to all tables extracted and the behavior is applied in order of the listed steps below
A full load: is attempted for each table if its number of rows is below the Pagination Table Size Threshold. The default is 500 000 and can be configured in advanced settings. If the row count of a table is above the threshold, the following step (pagination) is implemented.
Date Pagination: A date range is used to extract data. The first range is 60 days, thereafter 30 and lastly 15 days apart. 15 is the default value of the Minimum Date Pagination Range and can be configured in the advanced settings. In the event of a timeout or ODBC crash, the date range is dynamically adjusted. If loading still fails at the minimum date range setting, Data Hub will automatically fallback to the string pagination strategy. The following date columns have to be present for date pagination: CreatedDate and CreatedTime. When not present, string pagination fallback will be used.
Note
Date pagination falls back to string pagination if a page read fails. After reading that date range using string pagination, the next page goes back to date pagination and reduce the range back to the Pagination Days setting.
String pagination: Partitions the table into suffix combinations on a string column. Suffix length always starts at 1 and only increases if the page size is still too large. For example, if one character( 'a', 'b', 'c' etc.) is added, Pagination will run multiple queries to extract the data for each suffix. If extraction still fails, a second character('aa', 'ab', 'ac' and so ) will be added up to the length specified in Max String Partition Length. If the max amount of characters have been reached and loading still fails, more characters needs to be added to the setting.
What if loading still fails or times out
Paginated queries will time out if reading a row hangs for 1 min, and 2 more attempts are then performed for that same page before falling back to the next pagination strategy.
The migration then fails with a friendly error, and a model designer would have to review the logs and values of advanced settings to optimize partitioning.
Troubleshooting
This section aims to provide information about the Data Hub connector for Sage 100 as it relates to resilience of connections.
Key integrity errors caused by NULL values
You receive an error message at processing time reporting "cannot insert null into column [...]" when migrating source data in the warehouse
 |
This issue have manifested at a few customer sites when NULL values were found in columns that were part of Pipeline keys. In most cases, those NULL values should not have existed in the source as the columns were also keys in the source “tables”.
According to Sage Support, the Sage 100 application does not insert NULL values, the only possible scenario for such erroneous data is a partner add-on/customization or a user customization that either inserted or imported NULL values.
Data integrity issues have been mitigated for the following files and columns, however it may occur for other columns.
Customer – NULL values in the AR Division No column, instead of the default value of “00” when a division is not specified in Sage 100
Vendor – NULL values in the Division column, instead of the value 00
Item Transaction History – NULL values in the Stock location code column instead of the value 000
Sales Order History Detail – NULL values in column Sales order no
Accounts receivable – NULL values in column AR Division No
Accounts payable – NULL values in column AP Division No
Inventory – NULL values in Stock location code
To maintain data integrity in our solution and ensure the tables of the data warehouse can be properly indexed, the resolution has been and is to filter the NULLs out in those pipelines. Only columns included in keys have been filtered out. Any similar issue should be reported back to ZAP and the customer’s partner as a partner may also be able to fix the source data issues by running a Sage 100 data integrity tool.